Making a Halloween Town setup seems daunting, but it is really easy. I browsed for Halloween towns on the internet for inspiration, but everything seemed so complicated and time-consuming. So I thought to make an easy, effortless, and inexpensive iteration of this classic holiday decoration.
It was the first time I tried my hands at this DIY Halloween craft and I was not disappointed with the result. Now, I had some of the things already made for my Haunted Village setup, so it took me very little time. But if I had to make everything from scratch, the craft would take about 3-5 hours, depending on whether you have help or are going at it solo.
Also Read: 40+ Halloween Crafts for Kids
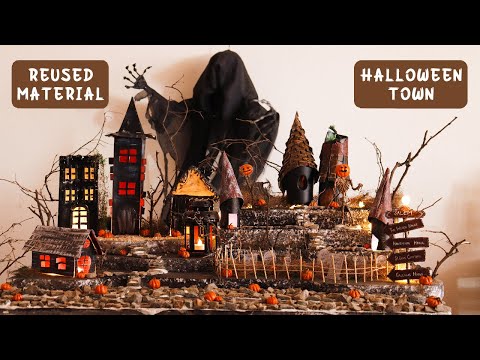
For this DIY Halloween town, all you need is a table, Styrofoam, paints, cardboard houses, twigs, gravel, string lighting, mini pumpkins, and someone to walk you through it. We’ve got you. Let’s get down to work!
Steps for DIY Halloween Town
Step 1: Set up the Styrofoam cutouts for town terrain on the table, and paint the visible points black.
Step 2: You can make tiny cardboard houses or purchase some from the Dollar Store. Place them on the Styrofoam landscape.
Step 3: Stick the twigs in the terrain to mimic spooky trees.
Step 4: Add a town sign, make a graveyard, include a Witch House, cement gravel on the side of roads, and make pathways. Place tiny pumpkins around the setup for a pop of color.
Step 5: Incorporate string lights around the landscape, insert a few lights inside the houses, and hang some on trees.
Also Read: 55 Ways to Make Halloween Pumpkin from Different Materials
That is it, your Halloween town is done and ready to adorn your house. Follow the video for the complete procedure.