Halloween is the time for reepy pranks and frightening fun – not just for adults but for kids as well. Decorating your home in Halloween spirit is a task you can achieve by involving every family member. If you are bored buying Halloween decorations and simply putting them up every year, do something new this time by going for Halloween crafts. Making some decorative items yourself will help create completely personalized home decor and some unforgettable family moments.
DIYing and decorating your home with creative homemade Halloween decorations can also help you save some cash. If you are looking for things yo u can make for Halloween, there are several ideas available online; however, we have picked some easy Halloween crafts for adults. You will love them all and want to try a few. Have a look:
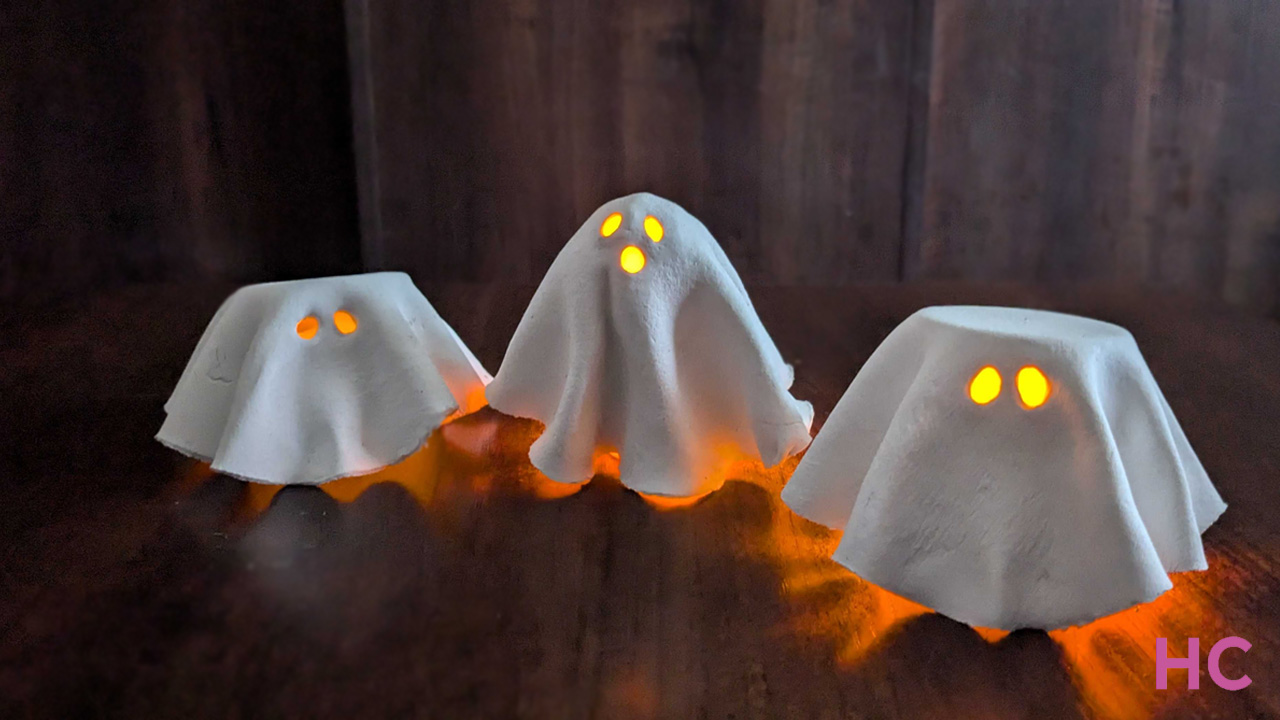
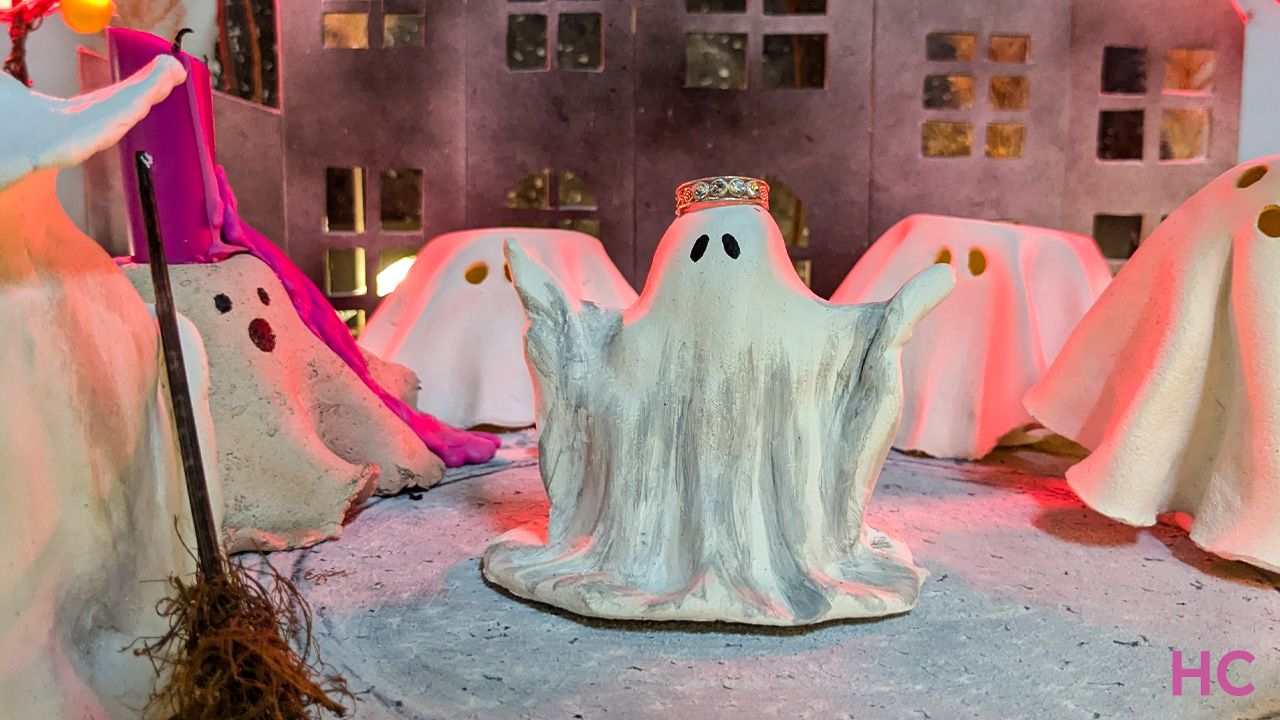
Ghost Tealight Candleholders
If you love clay crafts, this can be a viable option for you. Flatten two balls of air-dry clay and cut two circles. Place them over upside-down paper cups and shape folds to resemble a sheet ghost. Use a skewer to poke circular eyeholes. Let dry overnight, then display on your mantle or tabletop. Check the full tutorial.

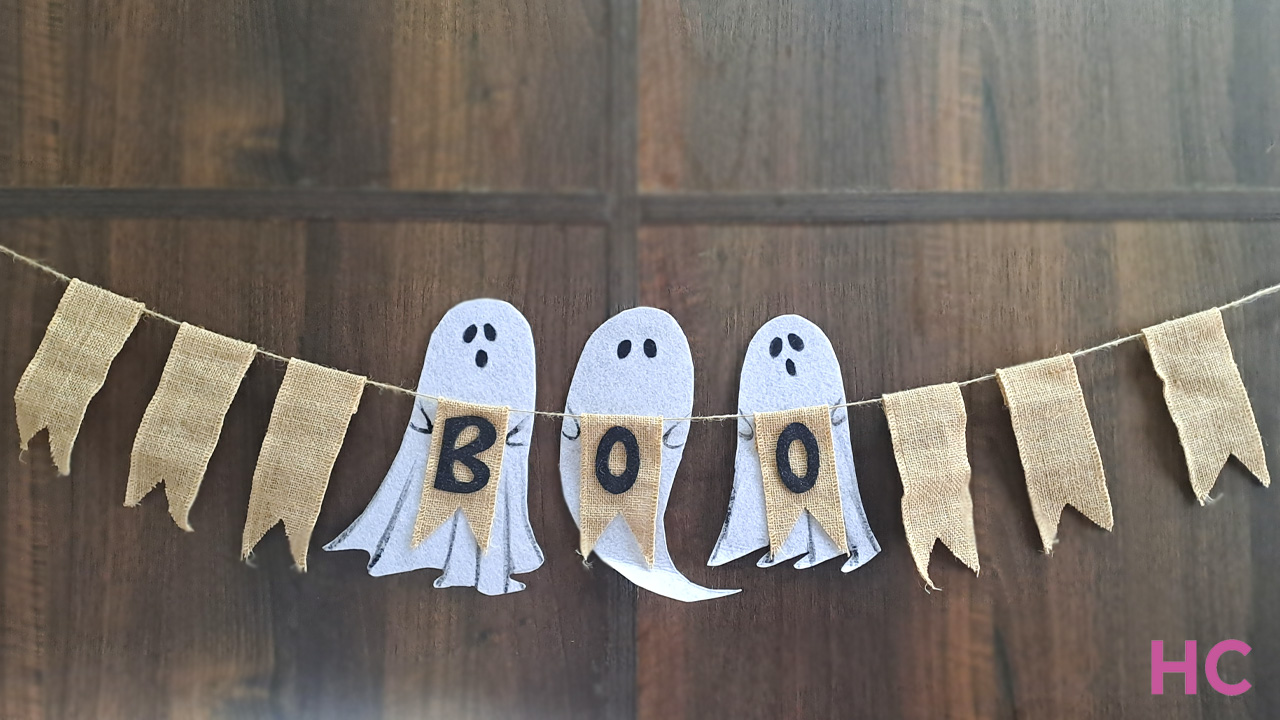
Burlap Boo Banner
Making a banner is easy and only needs a few materials. First of all, cut “Boo” letters from the black sparkle sheet, and then cut burlap ribbons twice as long with a V-shape cut at the bottom. Fold and glue the top of each ribbon to make holes to insert twine. Now, glue letters onto the ribbons. Thread twine through the ribbon tops, and it is ready to sit on a fireplace mantel or wall. See more details.
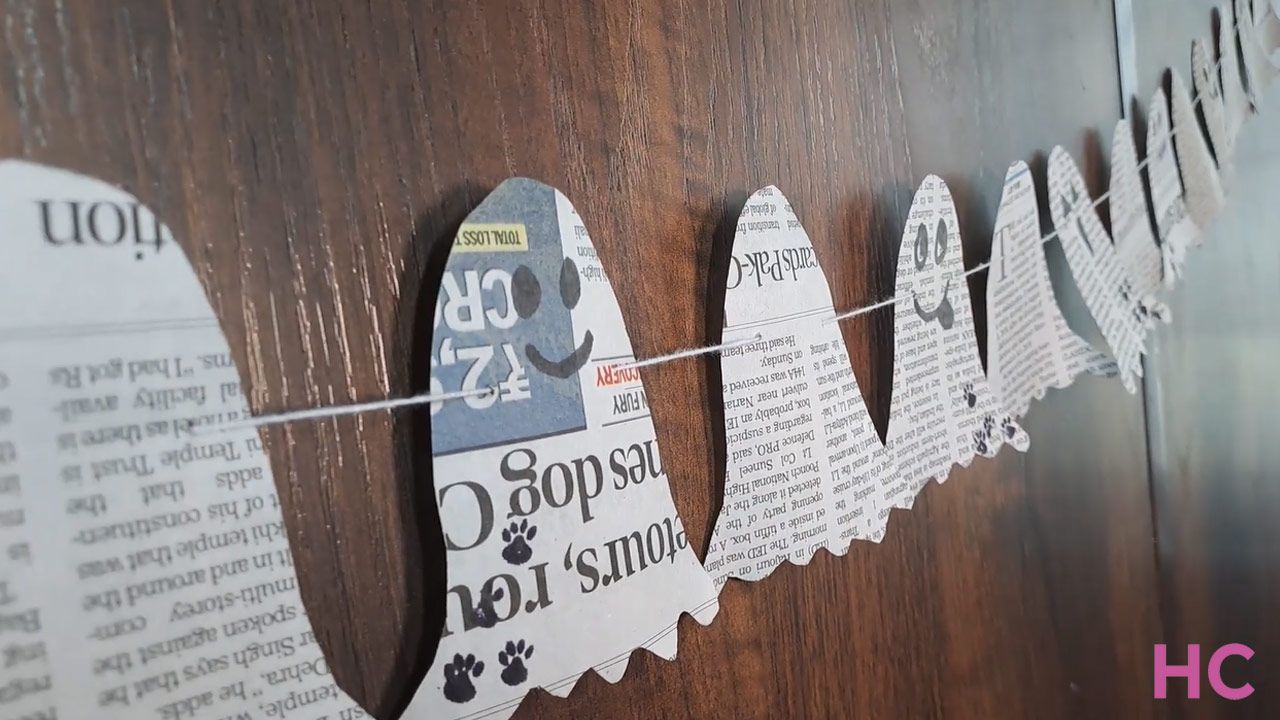
Newspaper Ghost Garland
If you are looking for an easy-to-make Halloween garland, you can try making one from unused newspaper at home. Start by folding the newspaper into neat rectangles and drawing a sheet ghost outline. Then, carefully cut the outline. Since the newspaper is folded, you will get multiple ghost cutouts. Take each ghost and draw eyes and mouths on it. Finally, use a needle and thread to string the ghosts together to make a garland. Check the tutorial for help.
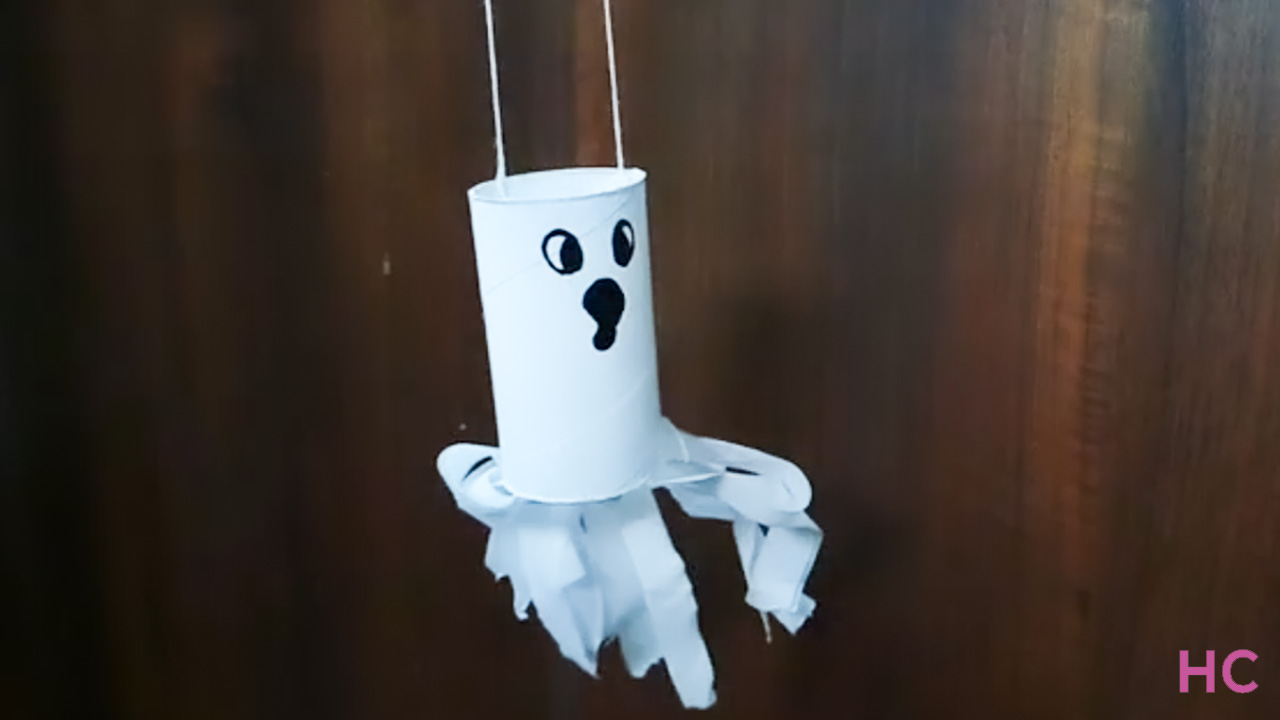
Toilet Paper Roll Halloween Ghost
If you have a toilet paper roll at home, you can turn it into a cool ghost decoration for Halloween. Just paint the outer side white and use toilet paper to cut long strips to hang below. Now, make eyes and a mouth using a black marker. Finally, attach a twine using tape and then hang it wherever you want. Check out the tutorial.
Clay Ghost Ring Holder
Simple creativity can turn air-dry clay into a dual-purpose item. All you need is to shape the clay into a ghost shape, but keep the base flat. This can be a great DIY Halloween decoration. Just keep in mind that its hands must be pointing upwards so that they can be used to hold the rings. See the full tutorial for help.
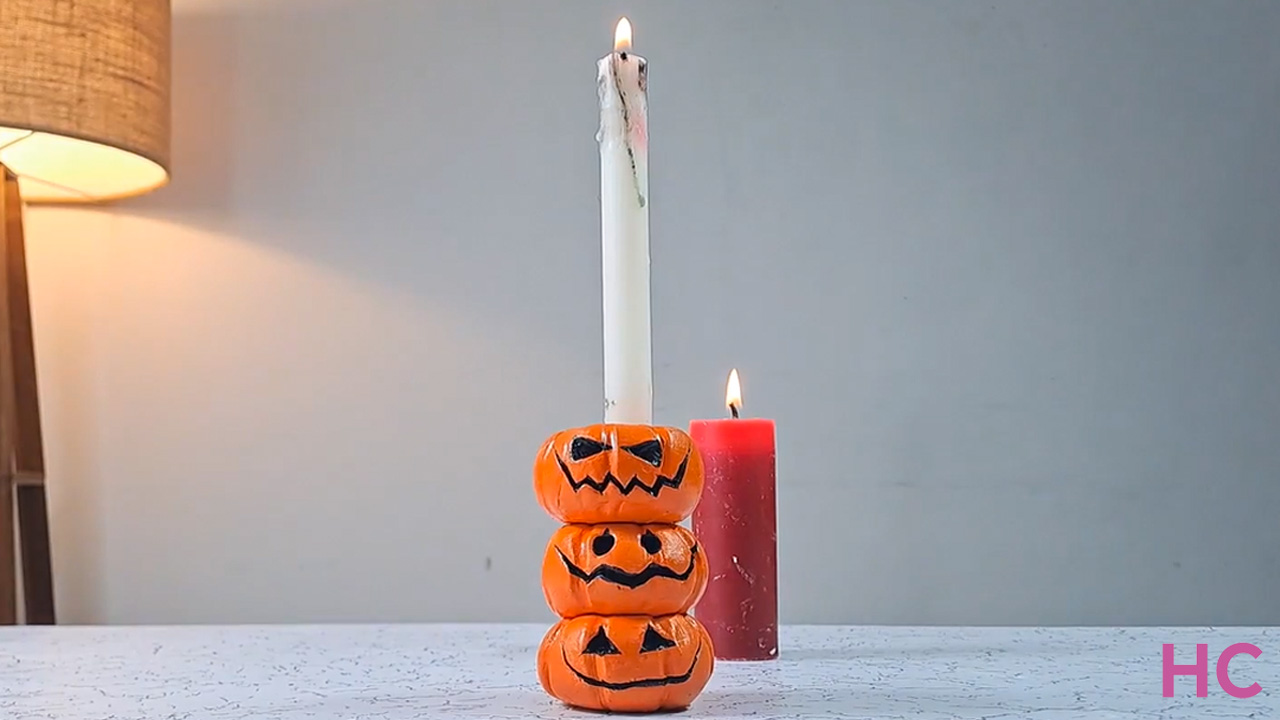
Jack-o’-Lantern Clay Candleholder
This is also a clay craft you can try making at home, as it does not require any special skills. Simply shape the clay into three balls and give them a pumpkin shape using threads or skewers. Now, stack the pumpkins over each other and make a big opening on the top one so that it can hold a candle. See full instructions in the tutorial.
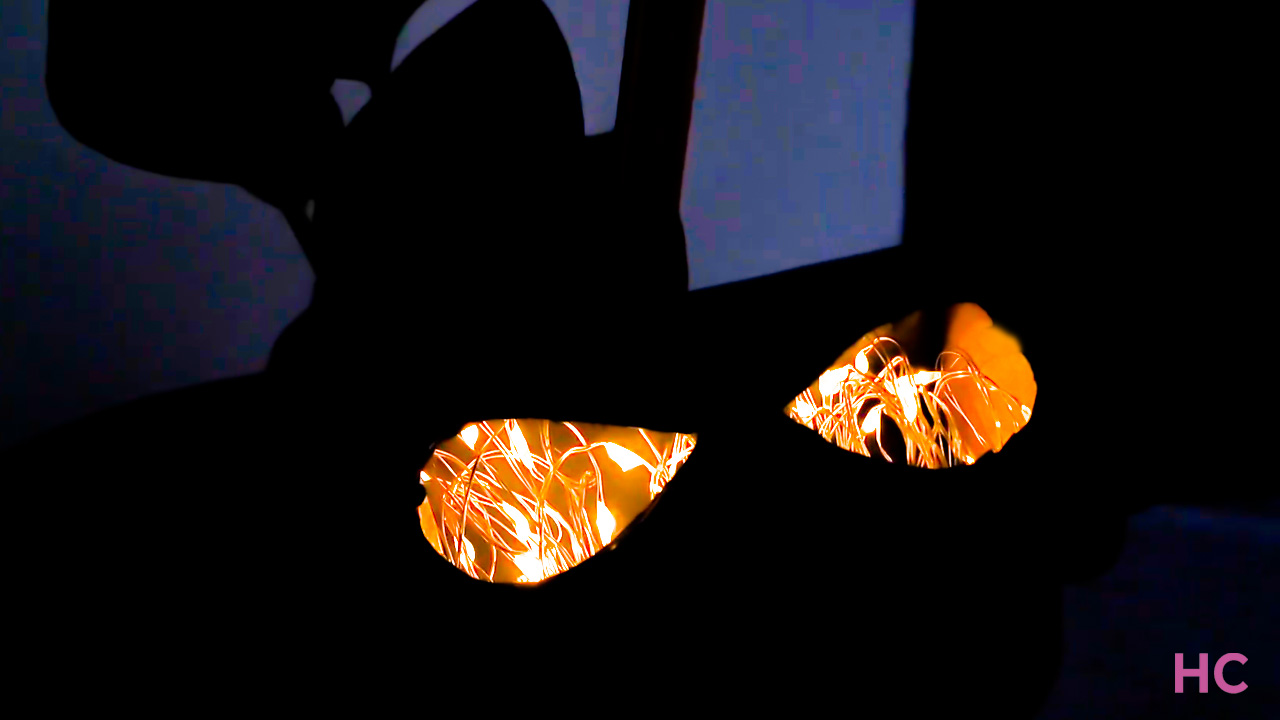
Toilet Paper Roll Glow Eyes
A toilet paper roll can be a great material for Halloween crafts – you can easily turn it into spooky eyes. The project starts from carving eye shapes on the roll and then painting it completely black for a scary feel. The final touch is given by putting LED light strips inside it, which would highlight the eye cutouts as fiery ones. You can get help from the tutorial.
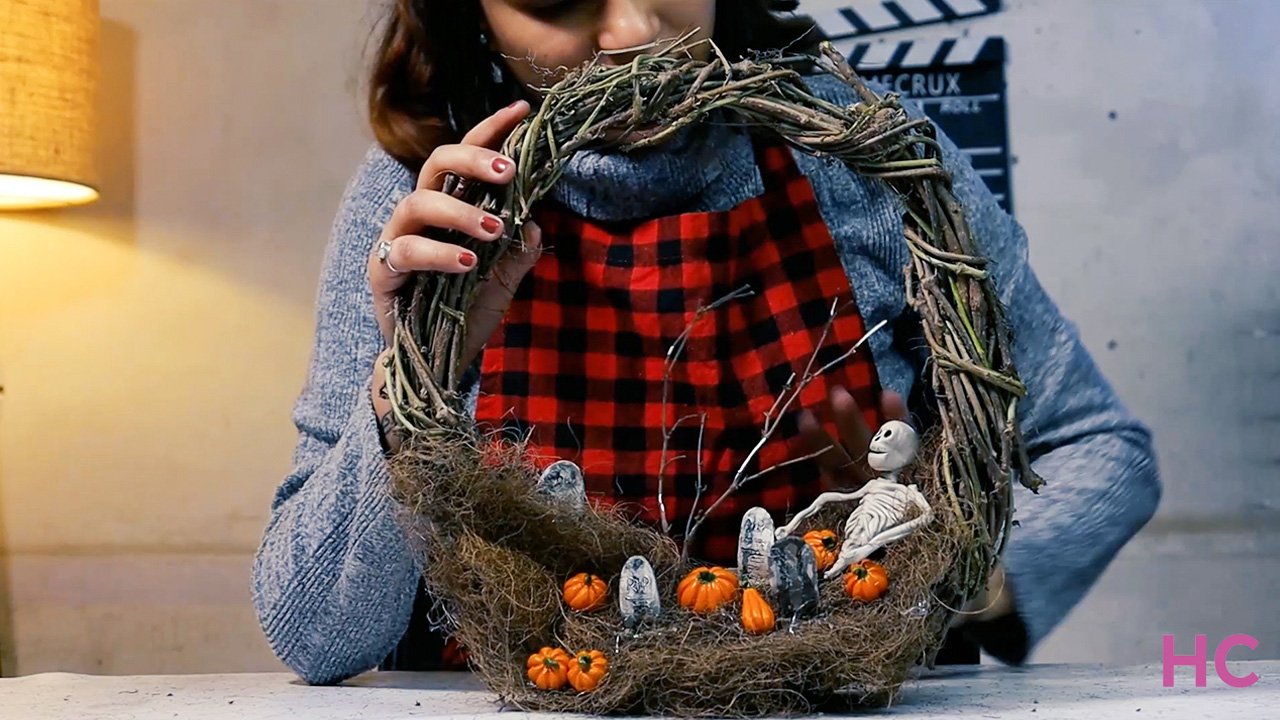
DIY Graveyard Wreath
You can also make a Halloween-themed wreath at home easily. You will need to cover the grapevine base wreath with moss or grass using a wire or hot glue. Next comes the task of putting decorations like tombstones and skeletons to give it a look of a graveyard. Also, add some little pumpkins for a pop of color. See more details for help.
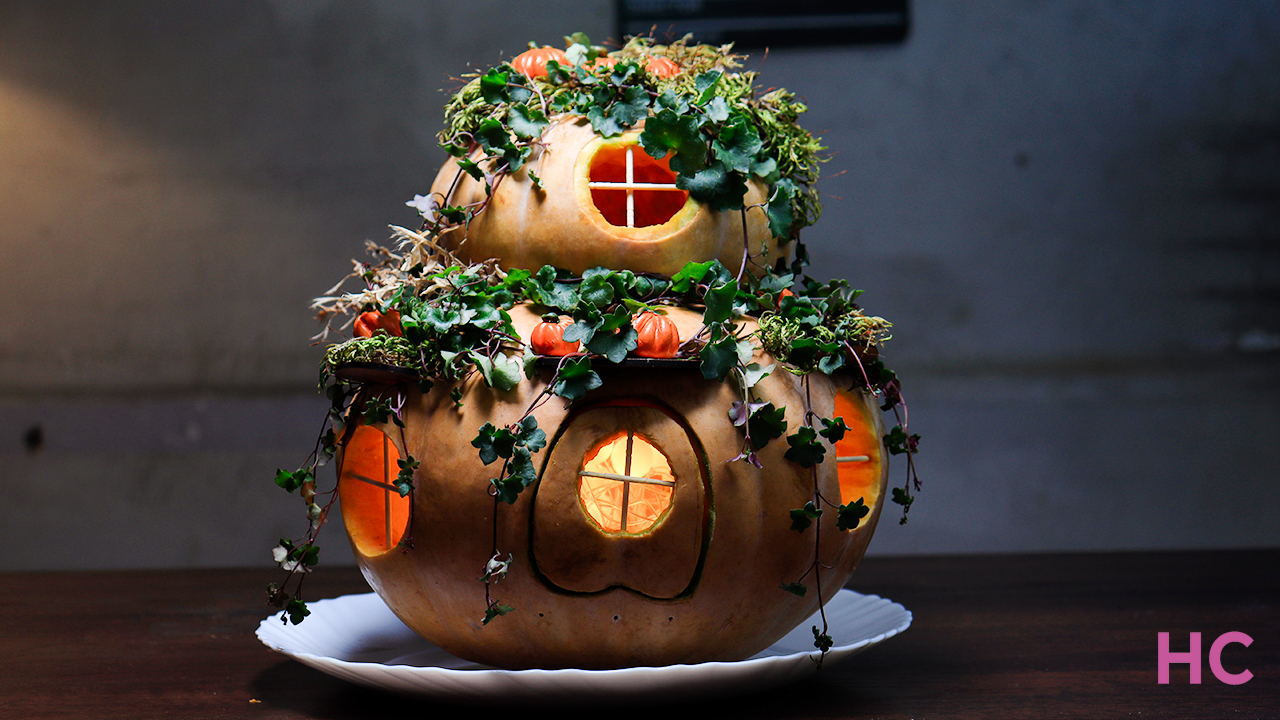
Pumpkin Fairy House
If you are a fan of pumpkin carving, you can also try making a fairy house using pumpkins. You will need a big and a small pumpkin that will be placed over it. You need to make round holes for windows and pin toothpicks in a cross to symbolize windows. Finally, decorate with greenery and little pumpkins. You can see the full process in the tutorial.
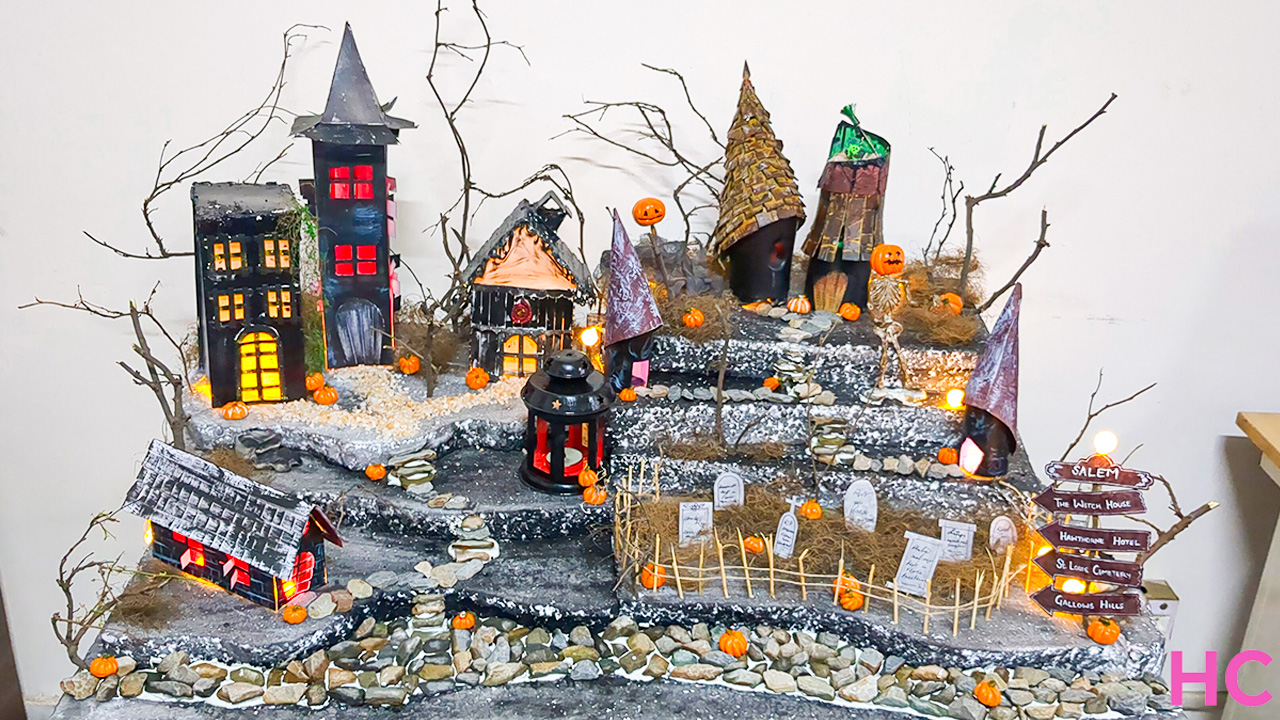
Halloween Town
If you have enough time and required materials, you can also make a big spooky Halloween town setup using Styrofoam sheets for the base and cardboard for mini houses and towers. You will also need twigs, gravel, lighting string, and mini pumpkins for decoration. Don’t forget to add a town sign with creepy place names and a graveyard. You can check out the full tutorial.
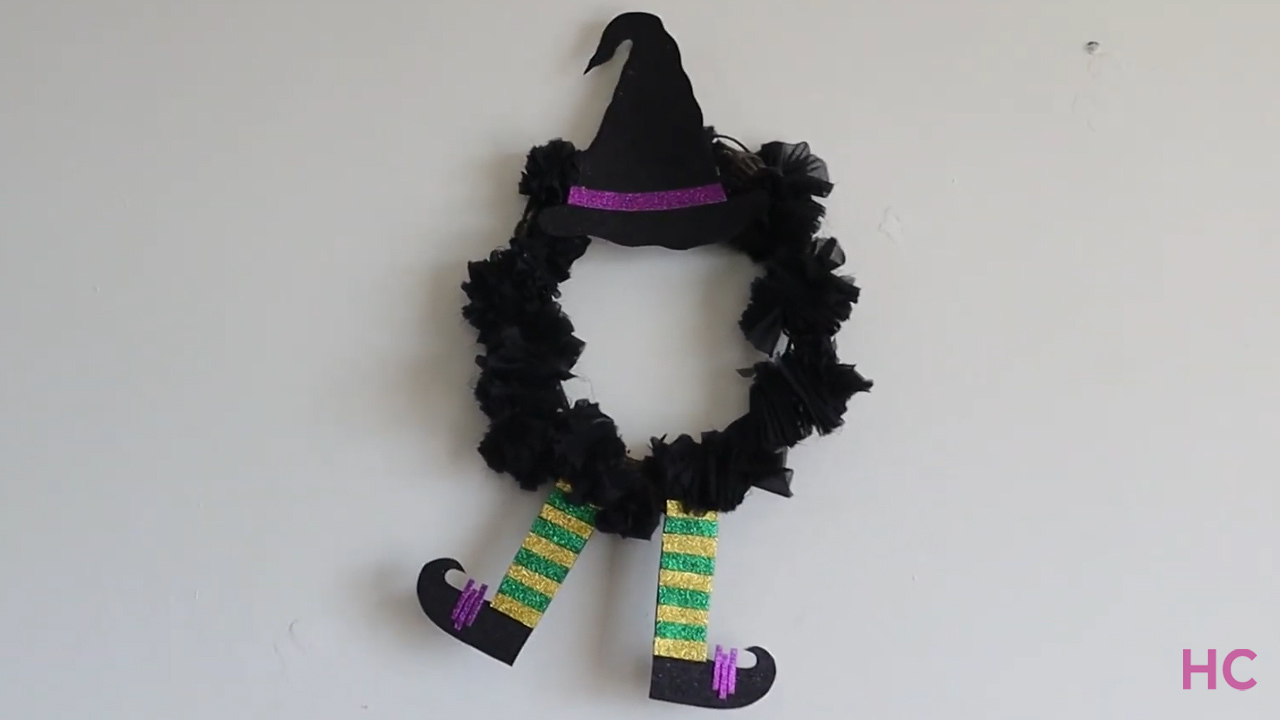
Witch Wreath
This is one of my favorite DIY projects that our team created a few years back. It easily catches the eye with its simple and effective appearance. You need to drape a black ruffle around the wreath base and then add a pointy hat and two legs cut from a glitter foam sheet to resemble a witch theme. You can see more details about the project here.
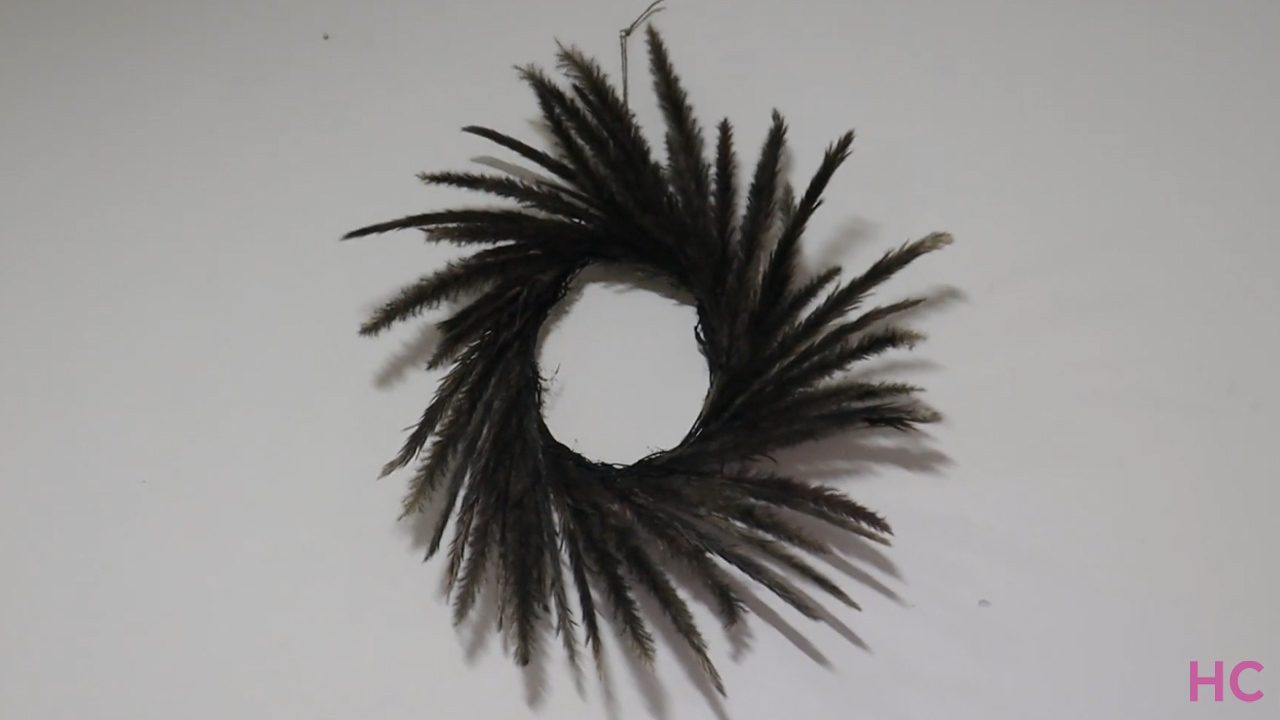
DIY Pampas Grass Wreath
If you find some pampas grass stalks around your home, they can easily be transformed into a creepy black wreath for Halloween decoration. You need to add them around a base wreath in a spiral pattern and then spray paint it black. In addition, it is upon you to further add any spooky elements such as bats, spiders, or festive ribbons. Check out how you can add the pampas grass stalks into an elegant pattern in our tutorial.
Clay Jack-o’-Lantern Candle Holder
Crafting your very own Jack-o’-lantern clay candle holder may be a bit challenging, but the result is absolutely stunning and reusable year after year. You can use different kinds of colors and carving patterns. See the full tutorial.

Clay Snake Candle Holder
Unleash your creativity with this DIY project made using air-dry modeling clay. You need to roll clay into a tube-like shape and then paint it in captivating colors. A large candle can be placed in the center of the snake candle holder. It will be a conversation starter that blends artistry with functionality.

Upcycled Witch House
This DIY tabletop witch house is made using an old air freshener can and has a conical rooftop made using paper. The shingles are made from cardboard. You can see the full DIY project on Homecrux.

Maleficent Wreath
This Maleficent Halloween wreath is an easy craft, and our in-house team prepared it in only 30 minutes. You will need a foam wreath base that will be decorated with black cloth. The horns are cut from black glitter paper. See the full tutorial.

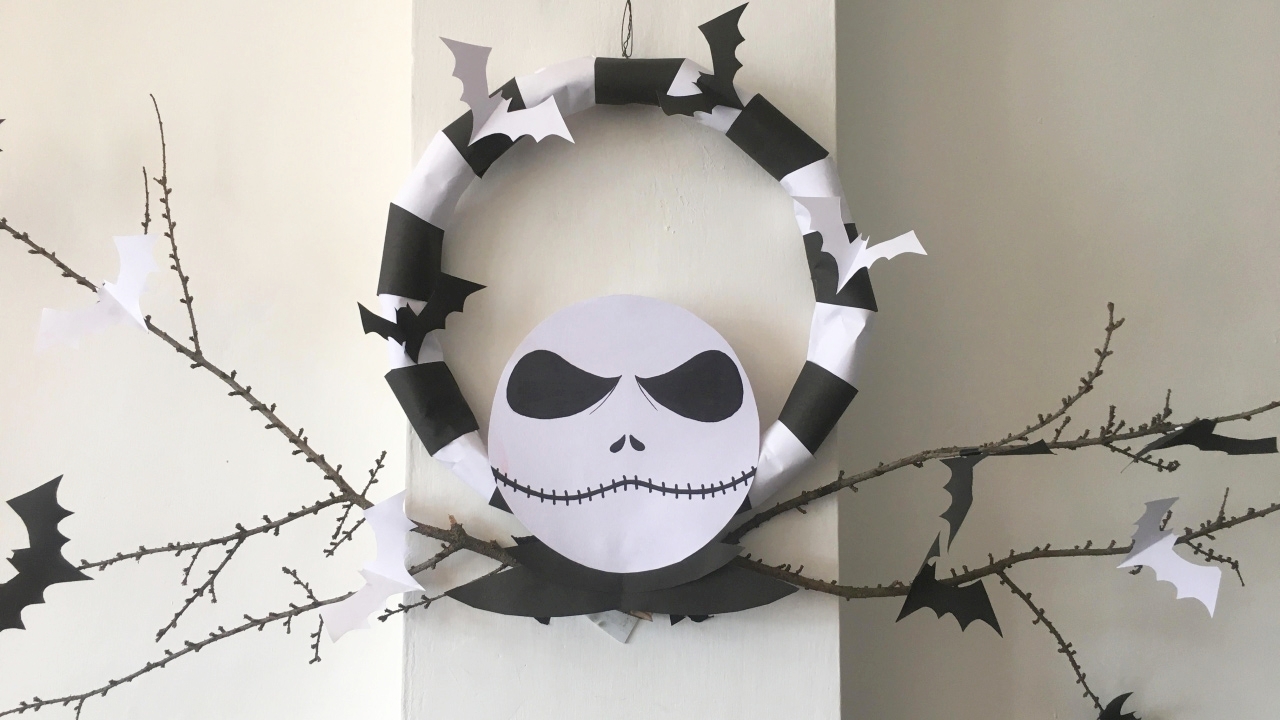
Nightmare Before Christmas Wreath
If you have a wreath base at home, then it can be used in the project. You just need to wrap it with brown paper and then with black and white paper ribbons in alternating patterns. The Jack Skellington face is marked on a piece of paper and then glued on the wreath. Get more details about the project at Homecrux.
Yarn Pumpkin Garland
If you are starting with crocheting, then this DIY project is for you. You will need orange and green yarn, which you will turn into pumpkins and a vine. Check out the making process of this Halloween craft for details.

Paper Bat Wreath
You can buy several Halloween wreaths from the market, but the one you make yourself has a different charm. This wreath is made of craft wire, and paper bats are glued on it. You can see the full project at Homecrux.

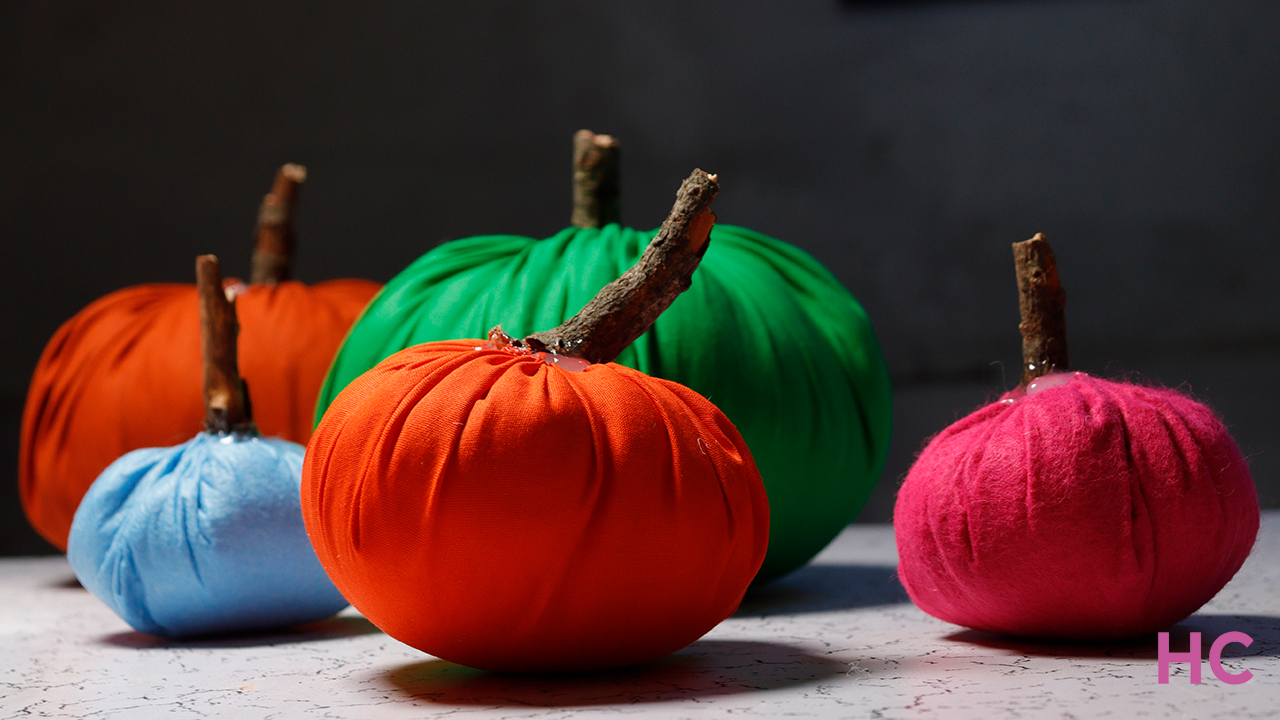
DIY Fabric Pumpkin
Creating your own fabric pumpkins is a highly favored option for Halloween and fall festivities, and you’ll find the experience truly enjoyable. You will require fabric pieces and sewing tools for this project. Details about the process can be checked out on Homecrux.
Jack Skellington Tealight Holder
You can get a vintage lantern from a local store, which would have to be painted black for a scary feel. The Jack Skellington cut-outs are then pasted on the glass sections to complete the look. The full tutorial is available here.

Miniature Graveyard
This DIY miniature graveyard is one of the most inexpensive decoration items you can make for Halloween. You will make a base from a plate and then layer it with clay. Then, the process of making the fence from toothpicks and tombstones from clay. The graveyard can also be decked with natural items like moss, twigs, dry leaves, etc.

Cute Ghost Candle Holder
This candle holder is made from a clay sheet, which is then twisted and folded into the shape of a cute ghost. The top needs to be plain so that a candle can be placed on it. See more details at Homecrux.

Paper Pumpkin Garland
It is a super easy and fun craft you can try this Halloween. You simply need to cut out paper in a flower pattern and then cut off the extra parts, leaving petals. Thereafter, you have to fold the petals into a pumpkin shape, and then your paper pumpkin is ready. Make as many as you want and finally string them up in twine. See the full tutorial on Homecrux.

Haunted Village
If you have enough time and paper-cutting skills, then this project is just right for you. The first task is to make tiny houses for the village from paper. Make as many houses as you need and paint them in a choice of colors. You will also need to make small trees for the village. When you have all the props, you simply need to display them on a flat surface. You can check out the detailed tutorial here.

Balloon Pumpkins
You can easily make these mini pumpkins by filling balloons with cotton. They can be strung together to create delightful Halloween garlands or used as decorations in various settings. See the full tutorial on Homecrux.

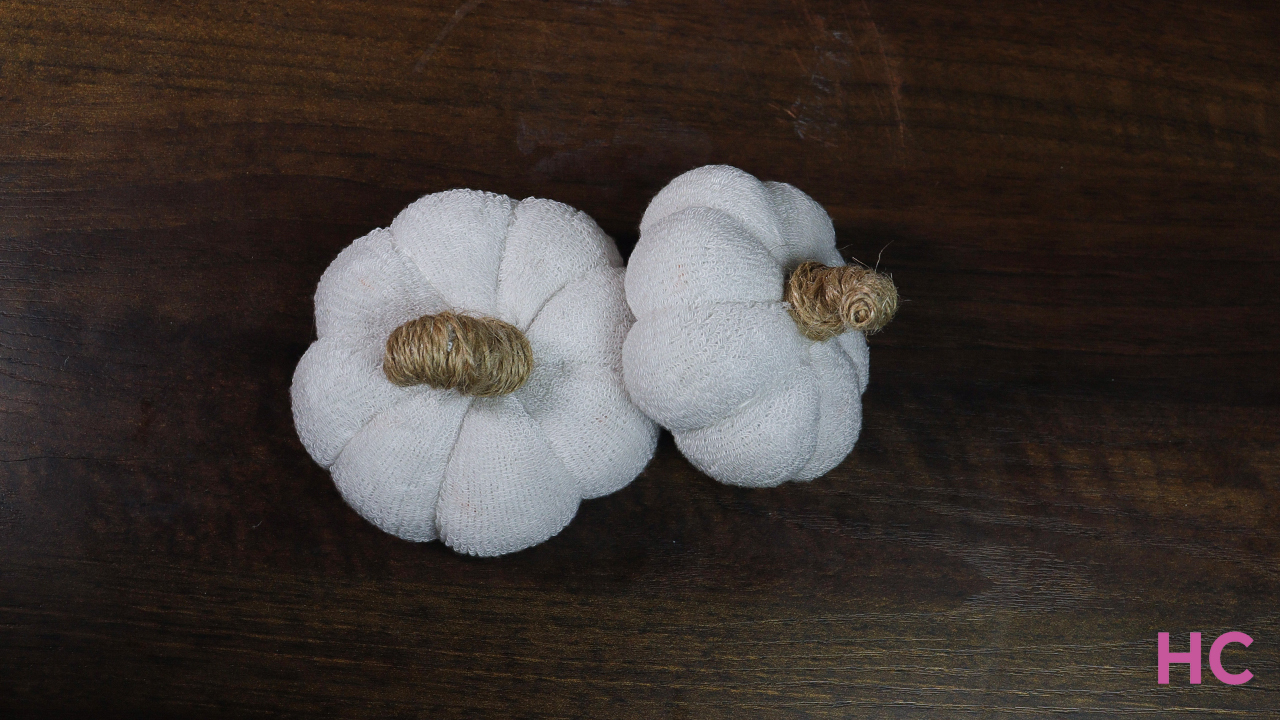
DIY Sock Pumpkin
Made from socks and cotton, this DIY project can be completed in just 10 minutes. Start by cutting off the top of the sock and filling it with cotton. Use a thread and needle to tug on the thread to make indentations on the sides to shape into a pumpkin. Finally, make a stem with the thread and coil a jute twine, and you’re done. Check out the complete instructional tutorial on Homecrux.
Bleeding Hand Candle
You will need a latex glove for this Halloween craft. Start by filling it with melted wax and make sure the wax spreads evenly. After it dries, you will get a creepy candle in the shape of a hand that will bleed when it’s lit up on Halloween. See the full tutorial here.

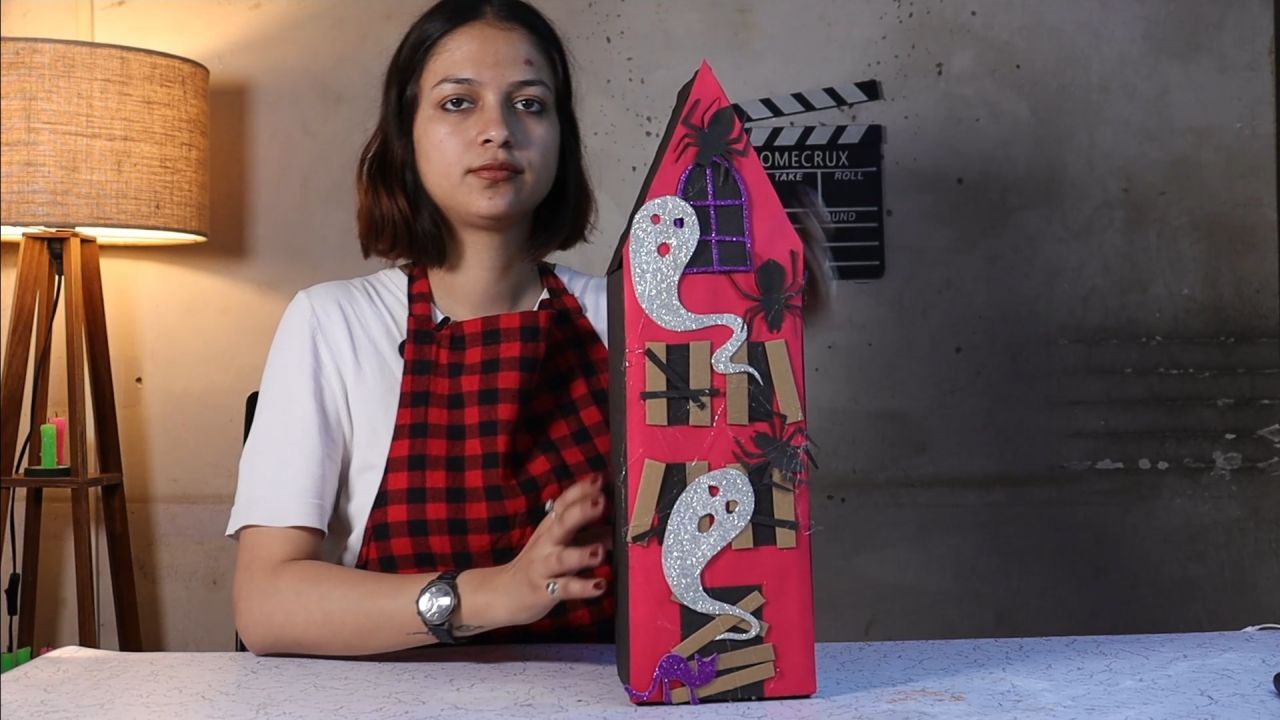
Haunted House from a Shoe Box
If you are thinking of crafting a haunted house of your own, then you can try creating it with unused items readily available at home. You’ll need an old shoe box, charts, scissors, hot glue, glitter paper, and Halloween-themed paper spiders. Read more about the recycled Halloween decoration project on Homecrux.
DIY Giant Spider
Building a giant spider and spiderweb in your front yard will be a creepy addition for Halloween. You will need to start by stuffing a large black trash bag with newspaper, plastic, etc. The next task is to attach the legs made of foam pipe insulation tubes to the front end of the bag with electrical tape. You will need to fill a trash bag for the head, but in a smaller size.
Finally, attach it to the main body of the spider and also add eyes to complete the build. You can check out the complete tutorial at Mom Endeavors.


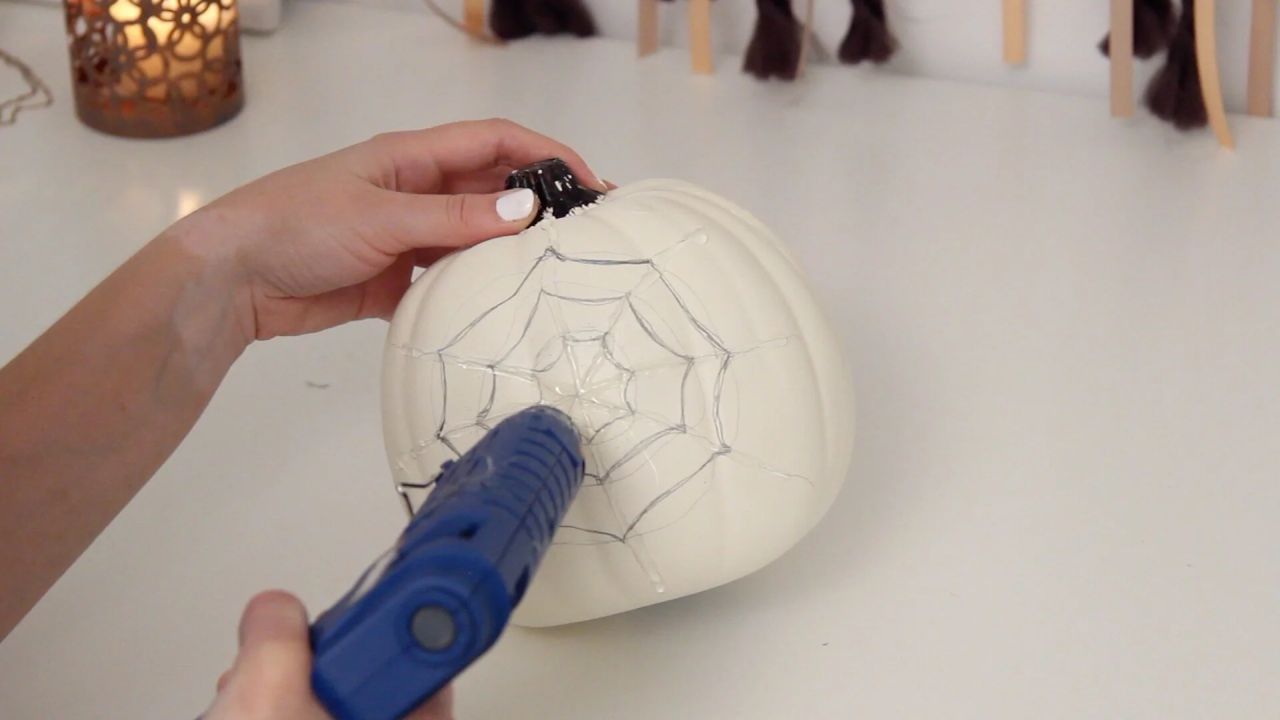
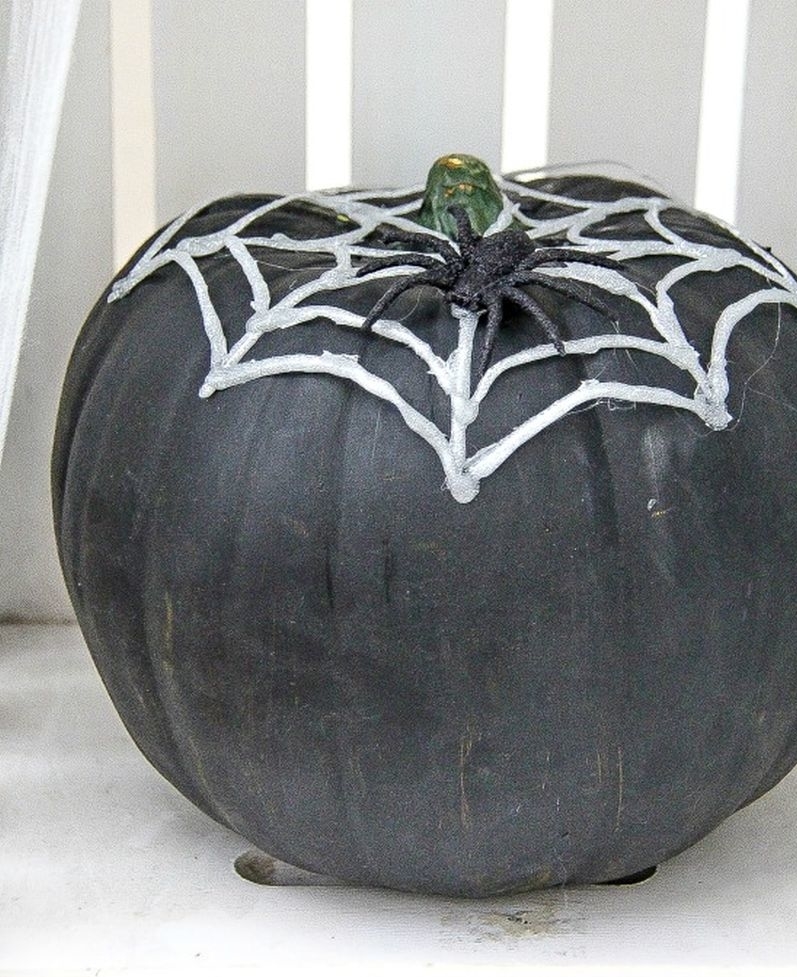
DIY Hot Glue Spider Webs
This project is really simple and can be done easily with the help of a hot glue gun. You just need to make a spider web shape, let it dry, and place it wherever you want! Making straight lines for the spider web will be a hard job, but it can be done with a few hacks. You can finish off the web by gluing a fake spider. See the full DIY by Katie Bookser.


Hanging Halloween Ghosts
Halloween decoration of your garden is definitely incomplete without spooky ghosts hanging around. To make this possible, you’ll need a white bed sheet and a styrofoam ball that forms the head of the ghost. You can even make a ball by bundling up unused plastic bags and wrapping them with tape. This Halloween craft is as easy as hanging your clothes in the closet. Read the complete tutorial by Evan & Katelyn.


DIY Scarecrow
During the Halloween season, you may have observed your kids going crazy seeing a scarecrow in someone’s backyard. You can also make one by yourself using straws and wood sticks. Take inspiration from this simple wood-frame scarecrow. All you need are some old clothes! See more details about the project at Make it a Garden.


Also Read: 100+ DIY Halloween Wreaths to Welcome Evil Spirits Home
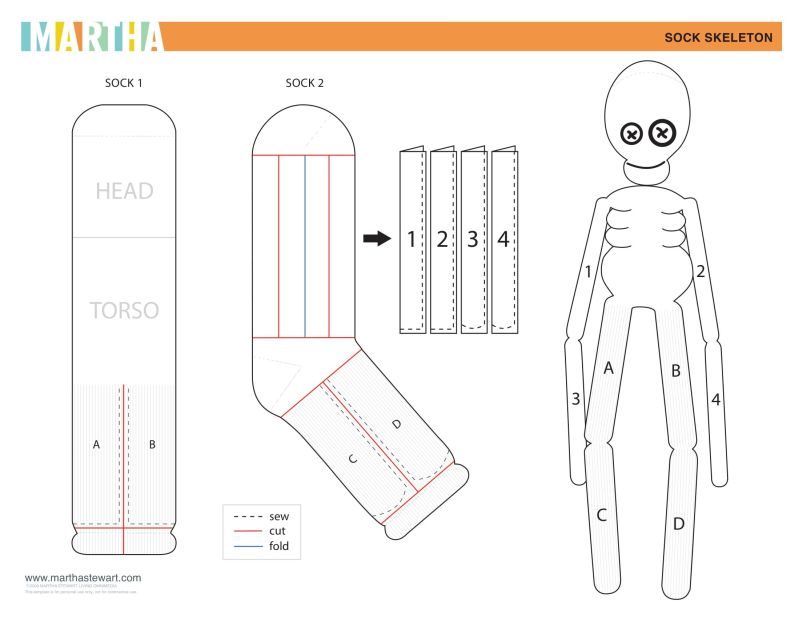
Sock Skeleton Doll
If you are a sewing enthusiast, this Halloween project is for you. All skeletal parts of these creepy dolls are made from stuffed socks, while brown/black yarn is used as hair. White and black buttons serve as eyes, while red embroidery floss is used for the lips. Get more details at Craft Passion.


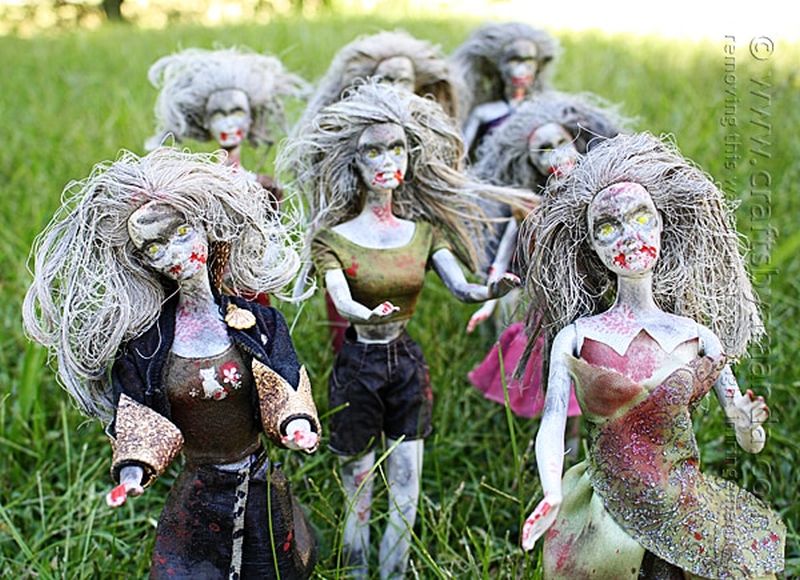
Zombie Barbie Dolls
Want to achieve a spooky outdoor in minimum time? Zombie Barbie dolls would be a perfect idea. The basic principle of this DIY is – the dirtier the dolls scarier they look. Let these zombie dolls invade your garden. Read on for more info.

Bleeding Candles
If you are looking for a cool last-minute Halloween decoration idea, these bleeding Halloween candles will be a perfect project for you. All you need are two standard candles in red and white. You will need to drip wax from a red candle over the white one. The red wax drip marks will look like blood coming out of the white candle! You can see full details of the Halloween craft at A Pumpkin and A Princess.


Lighted Milk Jug Ghosts
This is extremely easy and inexpensive. You’ll just need four empty plastic milk jugs and a few light strings. The main task is to put light strings into the jugs. Don’t forget to make Halloween-inspired faces on the milk jugs. Head over iSaveA2Z to find out more details.


DIY Pumpkin Bucket Jack-o’-lantern Totem
Plastic Jack-o’-lantern buckets and a light string are the two main components for this project. You will need to drill a hole in the bottom of each bucket so that the light string can be passed through easily. Finish up the totem by topping it with a witch hat. It will look great at the front door of your home. You can see the full DIY process at Scratch and Stitch.


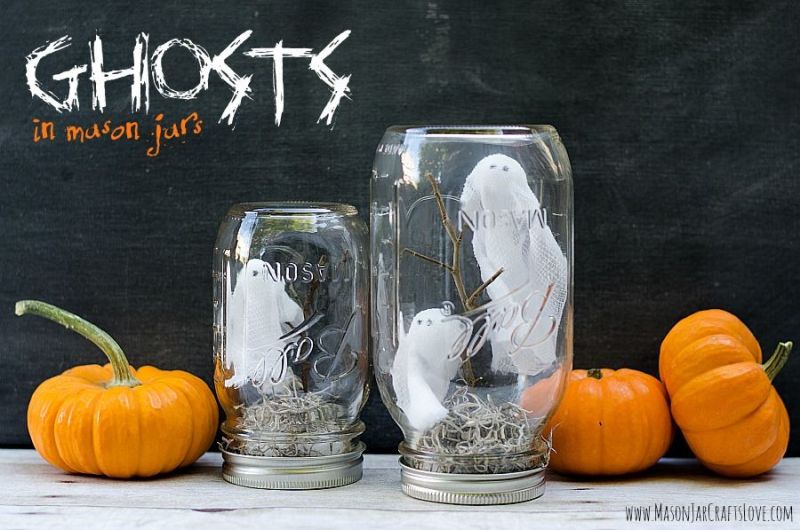
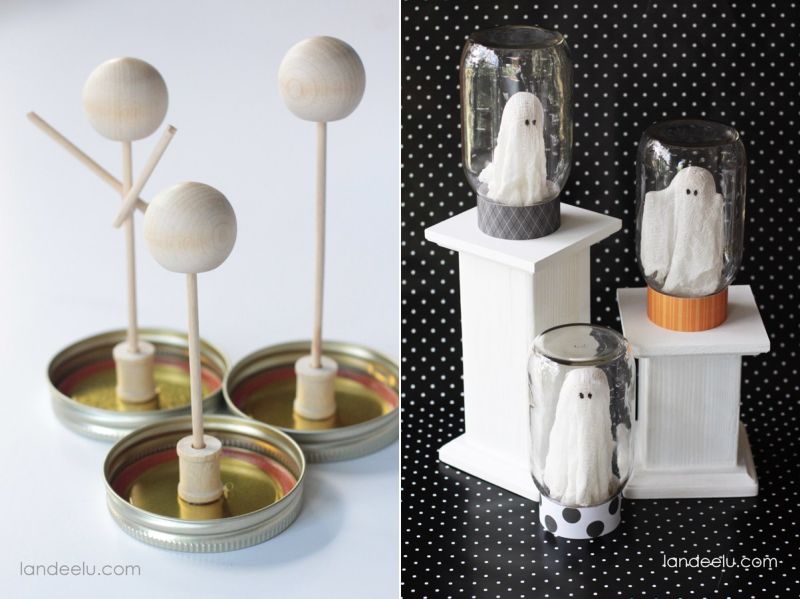
Halloween Ghost in a Jar
Want to imprison a ghost at home? This simple and easy DIY can let you do that in a jiffy. You will need to make a mini man-like structure that upholds a cheesecloth like a ghost, or just use a little wood branch. Put it inside a mason jar and place it anywhere in your home. More at Mason Jar Crafts Love.


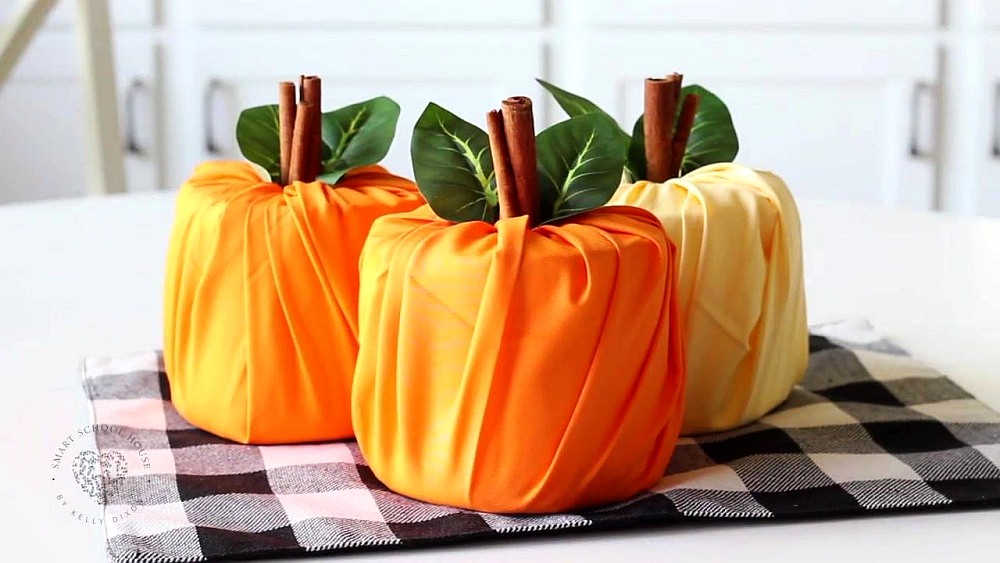
Toilet Paper Pumpkin
You don’t need to carve a pumpkin or have any special skills. You’ll be required to wrap a toilet paper in colored fabric and attach some fake leaves to give it a pumpkin look. If you are looking for a last-minute Halloween DIY, this is a cool and quick craft. Read on for more information.

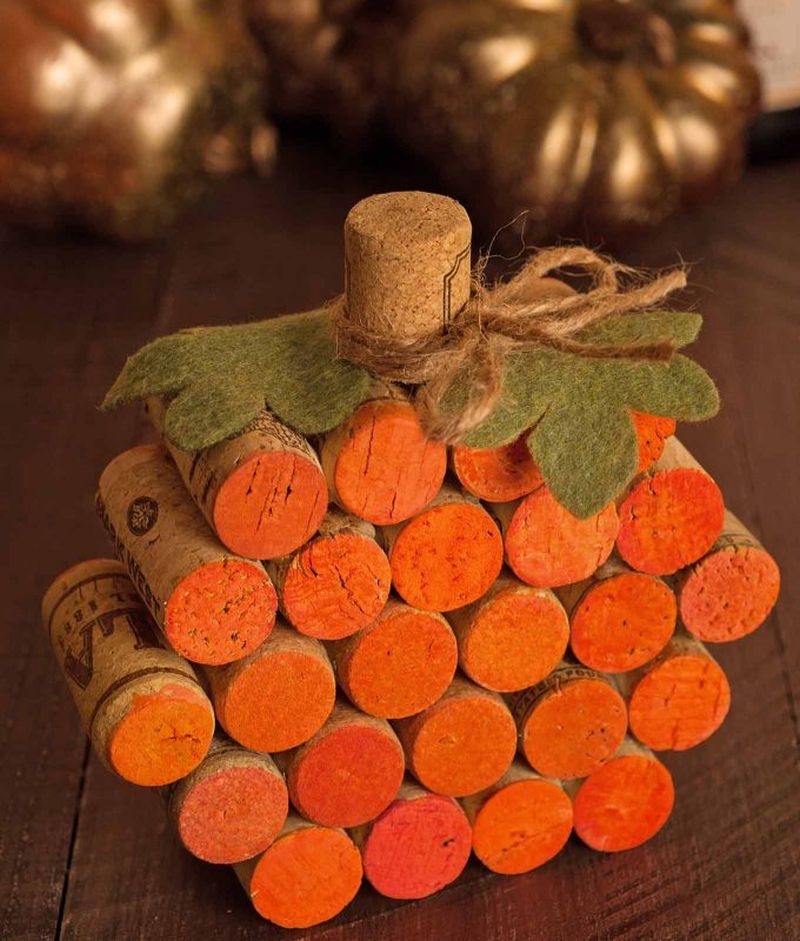
Wine Cork Pumpkin
How about making a pumpkin from unused corks? You will need about 30-40 wine corks, glue, and a few other supplies. Stack up corks in the shape of a pumpkin. Once done, glue a wine cork vertically on its top as a stem. It can further be decorated with jute twine and green felt. Check out the full tutorial here.

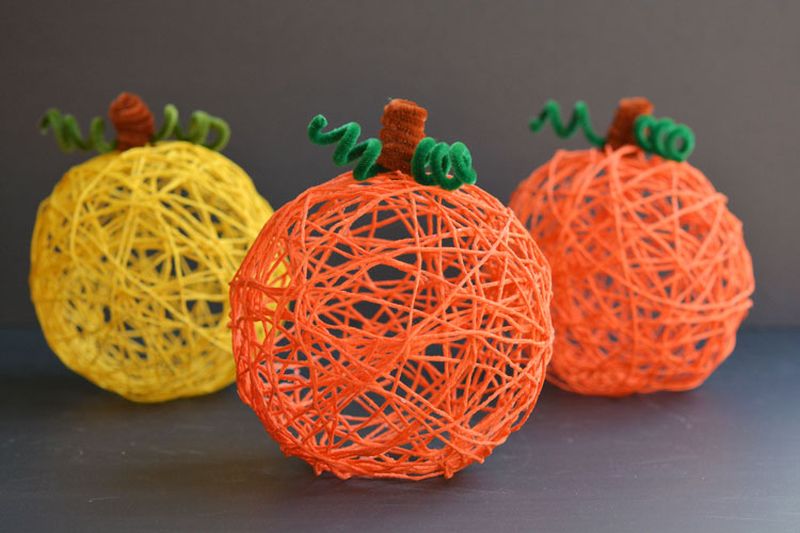
Yarn Pumpkin
To make a yarn pumpkin, you’ll require orange yarn, glue, and a balloon. Blow up the balloon and wrap yarn soaked in glue around it. Let it dry and deflate the balloon. Full tutorial at One Little Project. You can make pumpkin decorations at home from various other materials, including paper, wood, and even socks; click here for more ideas.


Rustic Wood Pumpkins
This Halloween, a pumpkin alternative is perfect to spook up the outside or indoor space of your home. It can be made using scrap wood and thus is a pretty cool idea for eco enthusiasts. You will need different sizes of wood pieces that need to be stacked/glued up one over the other. Just keep in mind that it should look like a pumpkin. Finally, a coating of paint will complete these rustic wood pumpkins. You can see the details of the project at DIY Swank.

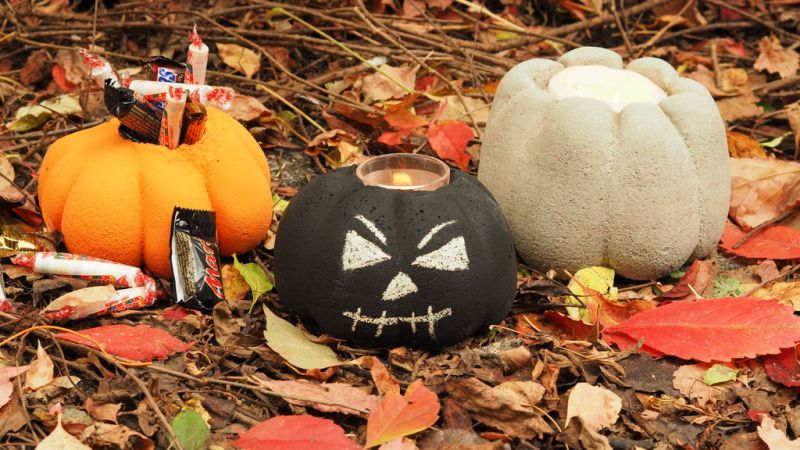
Concrete Jack-o’-Lantern
This DIY concrete Jack-o’-lantern can be used outdoors as well as indoors. It can be built using a concrete mix, old stockings, and rubber bands. Fill the stocking with a dough-like concrete mix and then tie with rubber bands to give it the shape of a pumpkin. You can leave a void to place candles or a lamp. Paint it in the desired color and you’re done. Here’s the tutorial if you want to try.

Also Read: Simple Halloween Crafts and Activities for Kids
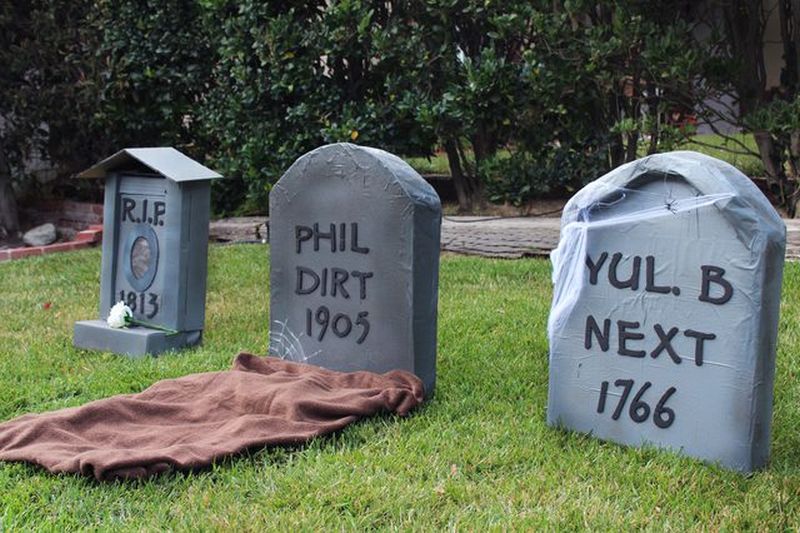
Cardboard Tombstones
Turn your backyard into a haunting cemetery with DIY cardboard tombstones. You will need to draw and cut frames for each tombstone from cardboard. Cover them up with newspaper before assembling and spray paint them in gray. In the end, paste some Halloween-inspired wordings to complete the look. See the tutorial here.
Bat Paper Craft
Paper crafting is a great hobby for kids as well as adults. The skills can be utilized in decorating the home for different occasions, such as making DIY paper bats for your Halloween decorations. Here’s a simple tutorial to learn how to make paper bats. There are a number of ways to include paper bats in home decoration. The simplest is pasting them on walls or maybe creating a stunning centerpiece by sticking them on a tree branch or a light string.


DIY Zombie Hand
If you want to make a wall decoration piece for Halloween, this DIY zombie hand decoration may be a cool option for you. You will need to glue up a fake hand decked with cheesecloth on an old wooden photo frame. The final task is to nail some wooden slats on the frame for a horrific look. Read here for more.


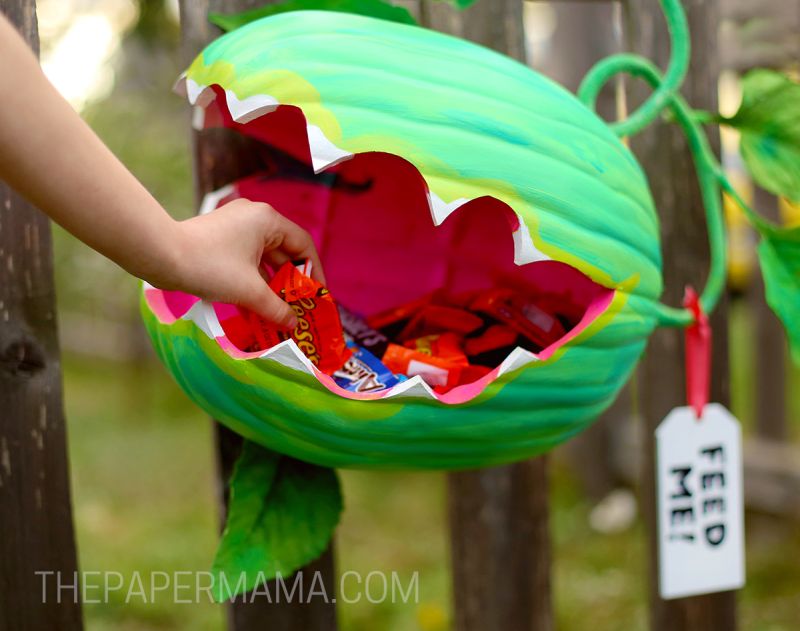
Venus Flytrap Pumpkin Candy Holder
It is an easy, homemade Halloween project that can be prepared in very little time. You will need to craft a foam pumpkin like a Venus flytrap, paint it, and have it filled with different kinds of candies. Then place it on your front fence and see kids have a freaking time with it. Read on for more info.

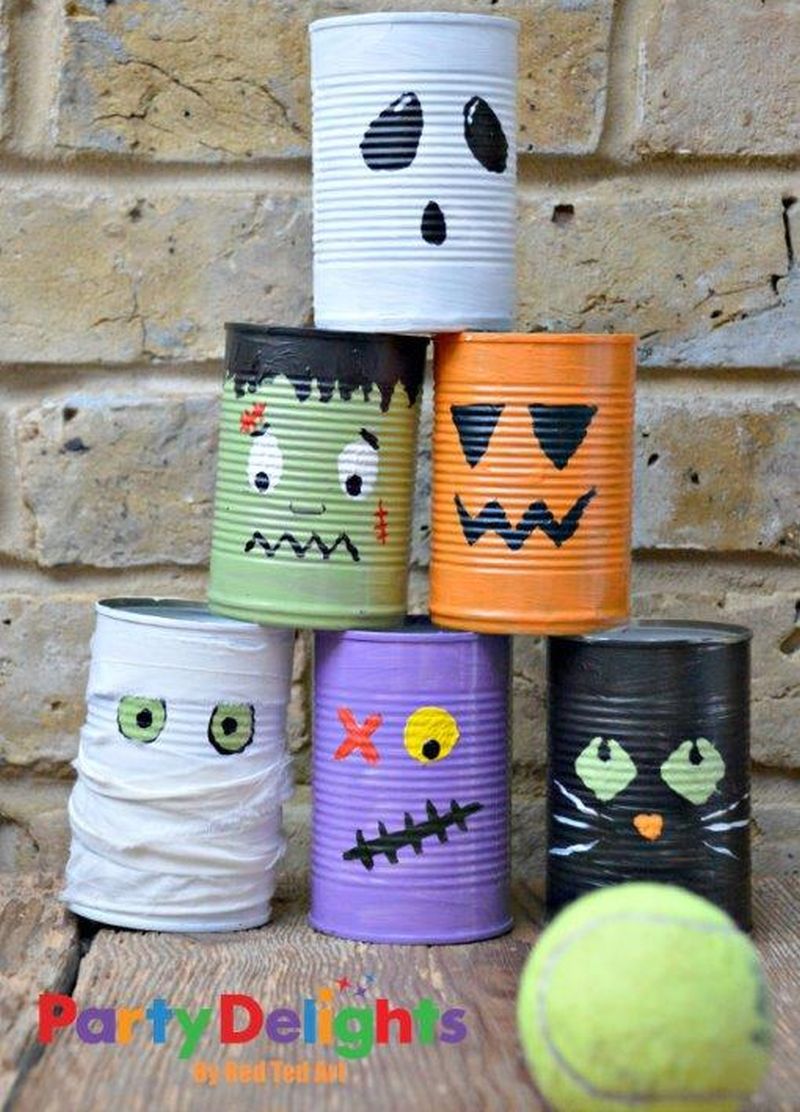
Tin Can Halloween Figures
Unused tin cans can be transformed into simple outdoor Halloween decorations with some paint and artwork. First, paint the tin cans in different colors and then let the artist in you loose to draw spooky faces on them. When complete, they can also be used for a bowling game on Halloween. For inspiration and help, check out the tutorial.

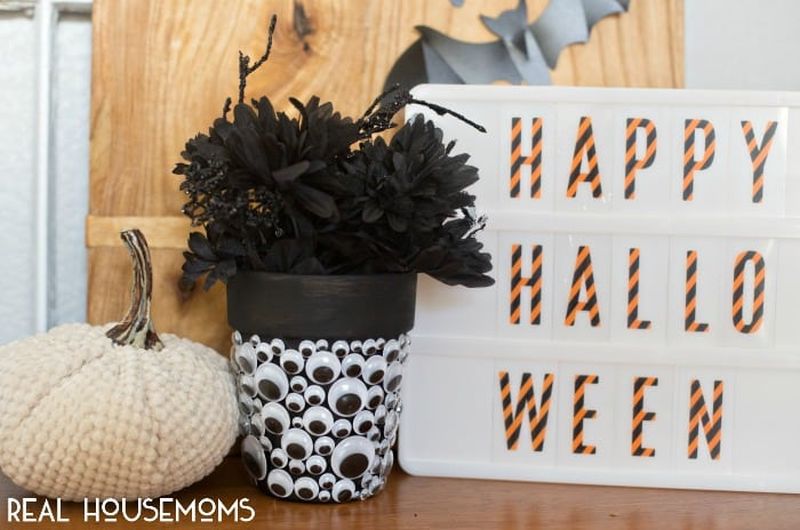
Googly Eye Planter
It is a witty DIY that you must try for Halloween decoration. You can make this scary googly eye planter yourself in very little time. Start by painting a terracotta pot black and pasting googly eyes of different sizes all around it for a daunting look. Here is a tutorial.
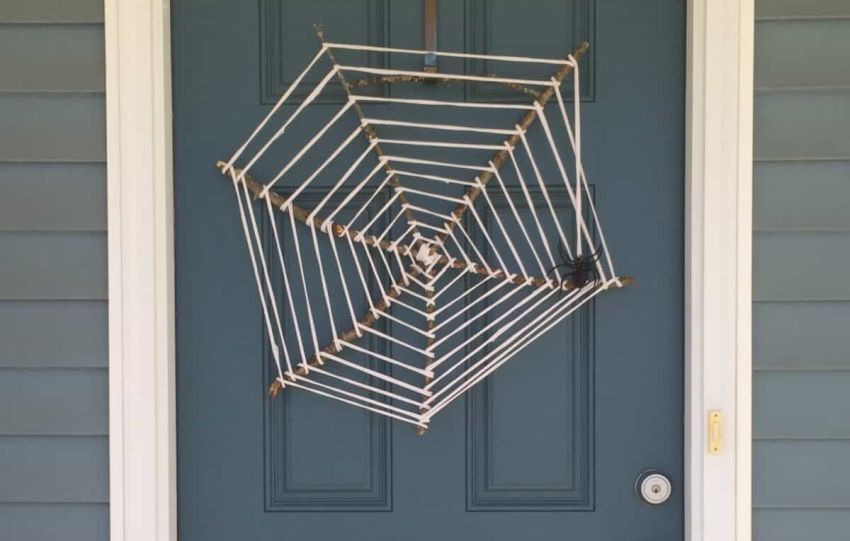
Spider Web Wreath from Twigs and T-Shirt
You can easily find twigs and thin tree branches in the neighborhood. Collect them and make some yarn from an old T-shirt, which should be woven as a spider web around the twigs. A hanging spider prop will spruce up your Halloween theme. Read on for details on this.

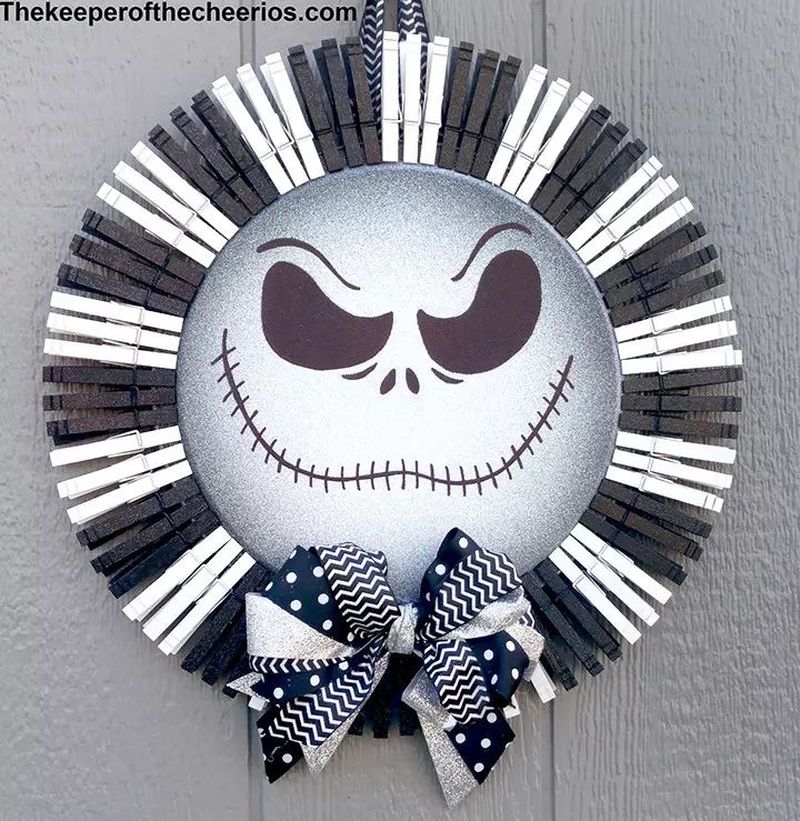
Jack Skellington Clothespin Halloween Wreath
You’ll need a pizza pan, clothespins, ribbons, and paint to make this Halloween wreath. Start by spray painting the pizza pan white and clothespins half white and half black. Sketch a Jack Skellington face on the pan and attach clothespins to the outer edge of the pan. Add a ribbon bow to complete the look. Check out the full tutorial at The Keeper of the Cheerios.

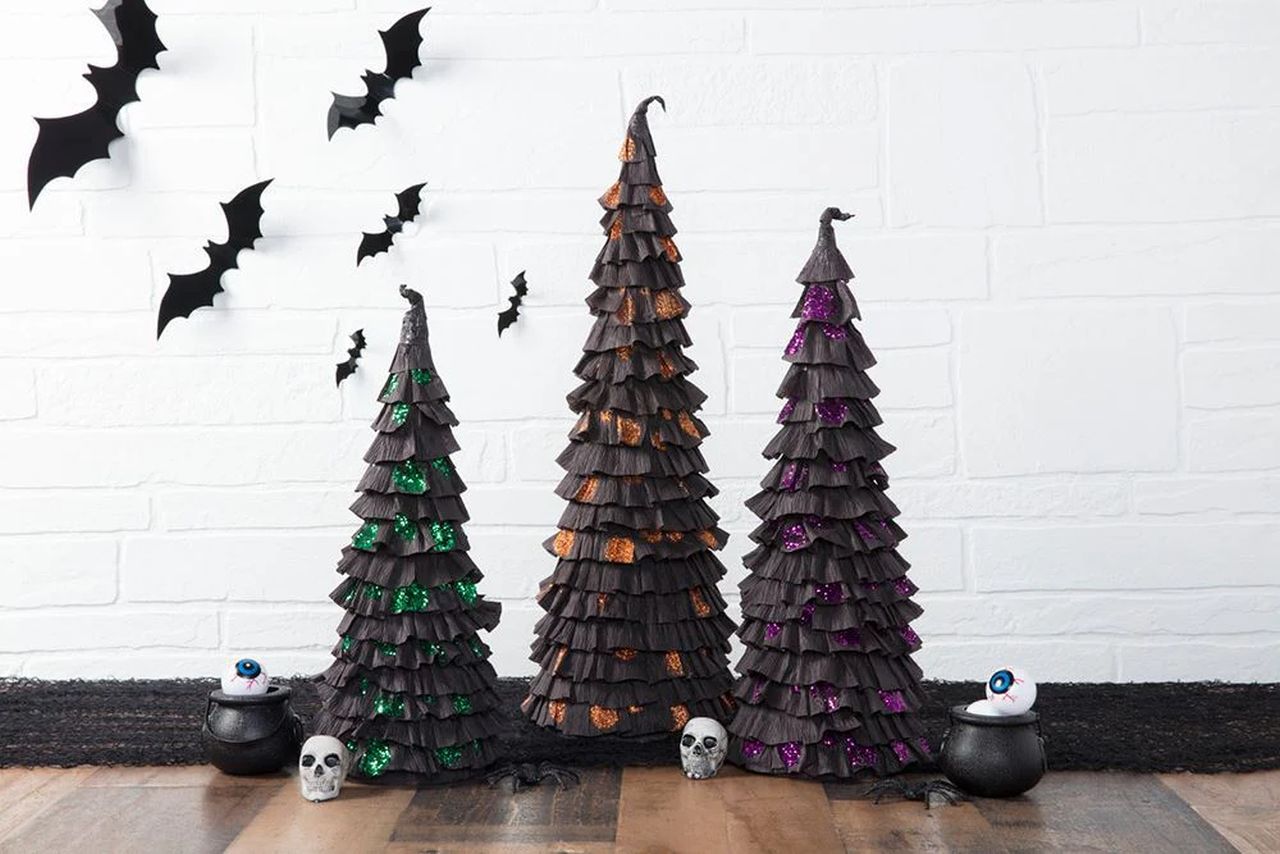
Halloween Mantle Trees
If you crave a not-so-scary Halloween party, this DIY Halloween decoration may be ideal to decorate the fireplace mantel at home. You’ll need crepe paper, papier mache cone, and glue. This ruffled tree is made by wrapping the paper cone with a black streamer to the top. Find out the full details here.

Halloween Wine Bottle Décor
Empty wine bottles you have ideally lying in your home can be used in Halloween decoration. From painting and decorating with googly eyes and cloth tape, there are a variety of ways to you can decorate them. Read on for more ideas.


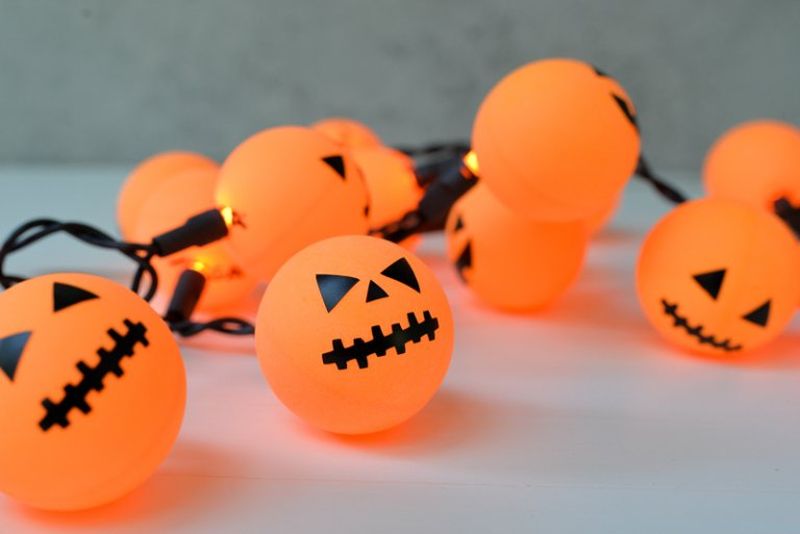
Ping Pong Ball Jack-o’-lantern Garland
Orange ping pong balls and a string of fairy lights can help you create this lighted Halloween decoration. Simply draw spooky faces on the plastic balls and make holes to put in string lights. See the tutorial at Hey Let’s Make Stuff.

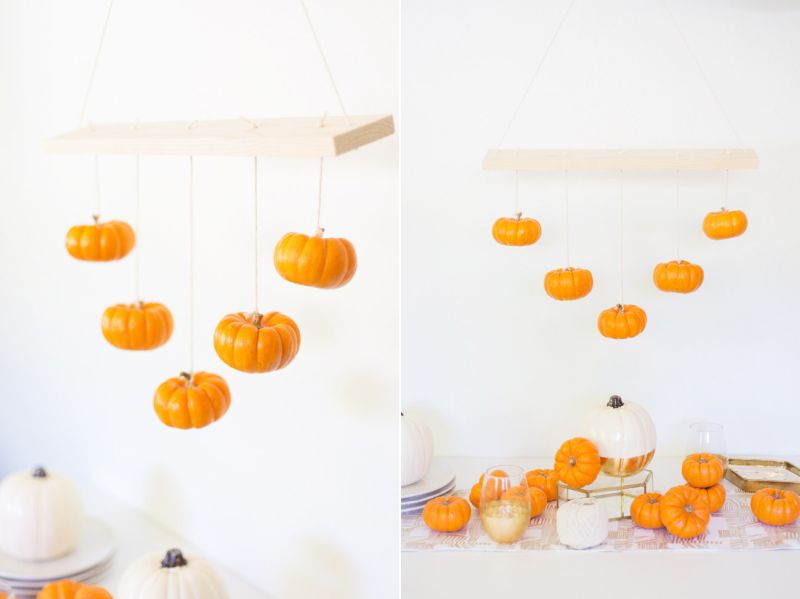
Pumpkin Chandelier
If you’re looking for a quick and unique way to use pumpkins at home, this DIY pumpkin chandelier shared by Momtastic may be a good choice. This hanging centerpiece comprises mini pumpkins, a thin wood plank, and a string. Drill holes in the wood slats and stems of the pumpkins to weave thread pieces through them. Let them hang like a chandelier above your dining table or at some other place in the house.
Halloween Frame Craft
This spider-infested welcome sign will look great on the front door or porch. You will need a large wooden frame, yarn, fake spiders, and black letters. Hammer in small wire nails and then create a random pattern by wrapping the yarn in support of these nails. You can attach some cotton to make spider webs. See more picture frame Halloween decor ideas.

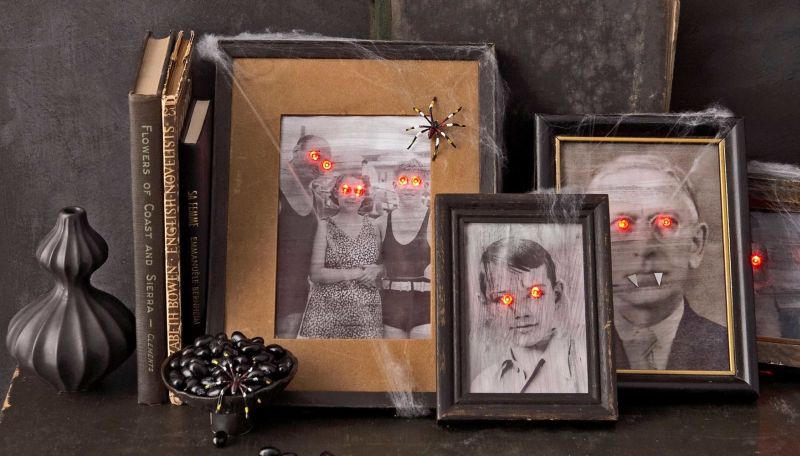
Paranormal Portraits with Glowing Eyes
These vampire portraits will add a frightening touch to your home. You will need a black/white photo that will be pasted on a cardboard of the same size. Make holes in the eyes of the photo with a precision knife or needle. Insert red mini LED lights into those holes and finally frame the picture. Read the full tutorial here.

Spider Frame Wreath
This is a cool DIY Halloween project to decorate the interiors of the house in a not-so-scary way. You will need to just attach a fake spider to a photo frame and then display it on a bigger frame. It is further decorated with tulle in different colors. See the full project at Organize and Decorate Everything.


DIY Witch Hat
Witch hats are a quick and simple way to show your passion for the Halloween celebration inside your home. You will need a witch hat and a few other craft supplies. The hat is filled with tissue paper, placed on a plate, and then it is balanced on a candle. You can decorate the hat with ribbon, small skulls, and other small decorations. Read the full DIY process on Just a Girl Blog.


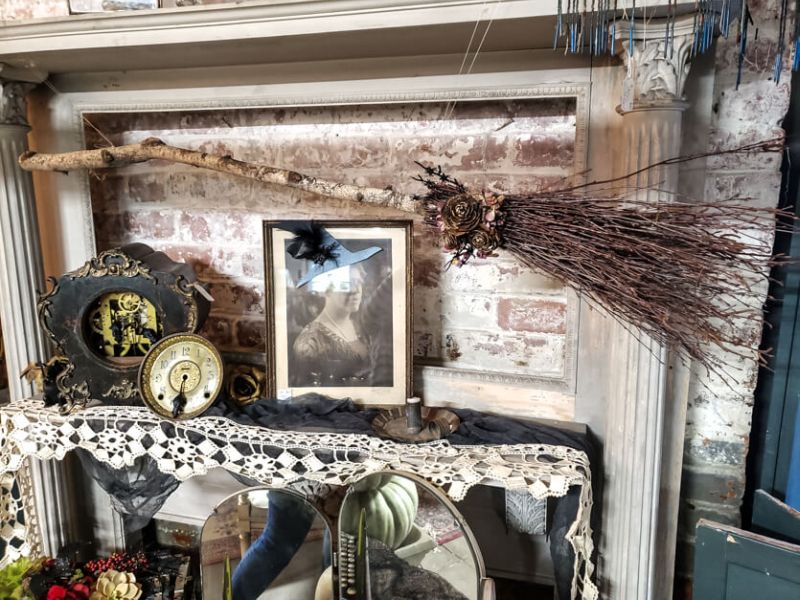
DIY Witch Broom
Making a witch broom is super easy. You just need some thin tree branches and a string. Bundle up the branches and tie them on a wooden stick using a string. The witch broom is ready, and you can display it inside or outside your home. You can read more information here.
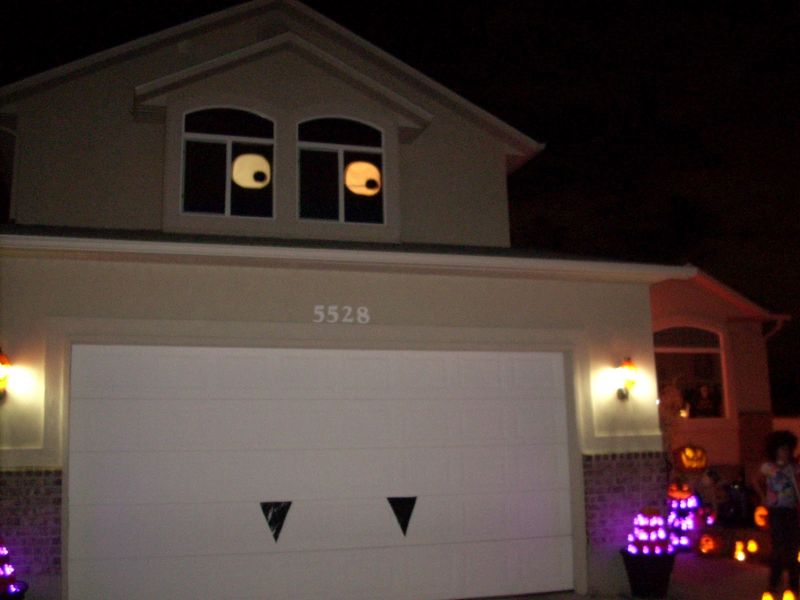
Halloween Window Eyes
Deck out the windows of your bedroom with eyes staring out to scare the neighbors and trick-or-treaters. You can cover up the windows with black trash bags and create two holes at an equal height to appear like eyes when the light is turned on inside. Follow the tutorial here for the complete process.