
I’m very devoted to my work, so much so that I often say I’m married to it. I love coming up with ideas, creating new things, and crafting recipes just for the joy of it. It’s not something I’m required to do; it simply brings me a deep sense of joy and satisfaction. As the saying goes, when you love what you do, it never really feels like work.
Unfortunately, this leaves me with little free time to spend with family. But every year, my siblings and I make it a point to celebrate Mother’s Day together with our mother. This Mother’s Day, I wanted to do something extra special – a lavish brunch, all cooked by me. I spent this past Sunday practicing, ensuring everything is just right. I created recipes, each one better than the last in both presentation and taste. Today, I’m sharing my entire Mother’s Day brunch menu – with recipes for appetizers, salads, potatoes, desserts, and much more – so you can take some inspiration and cook some or all of it for your mum as well.
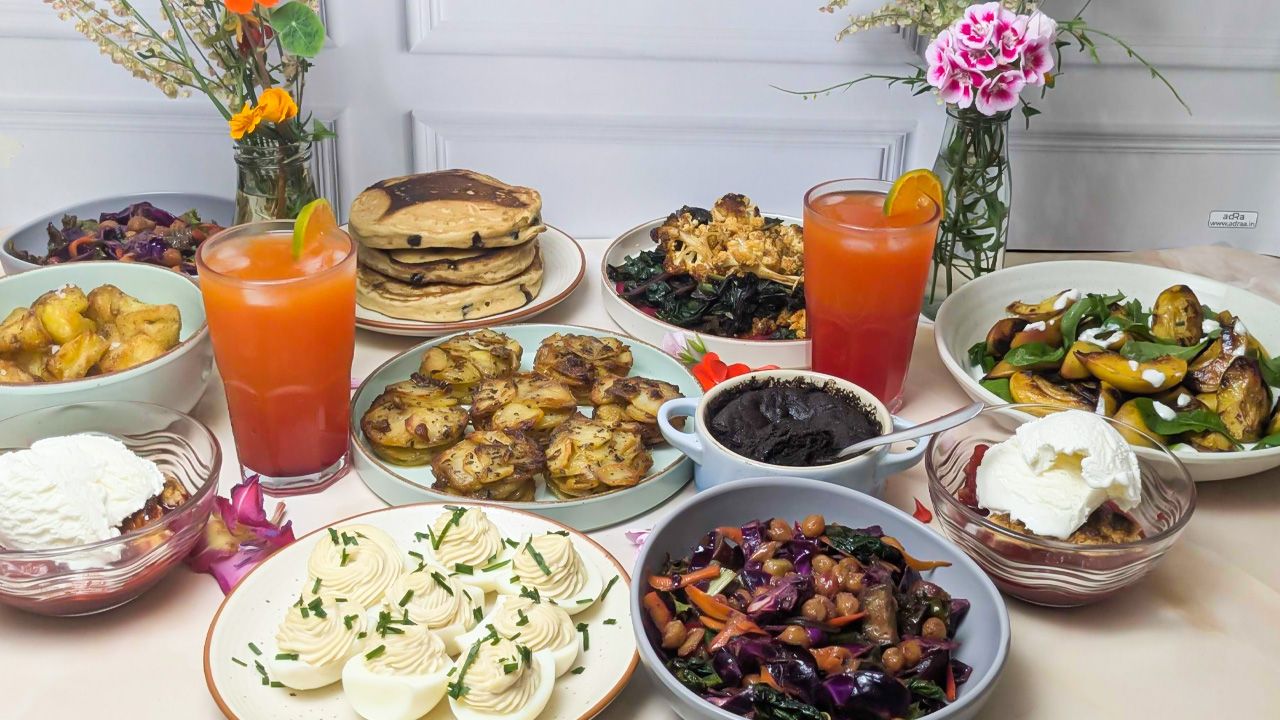
My Mother’s Day Brunch Recipes:
- Garlic Stacked Potatoes
- Sweet and Sour Salad
- Grilled Peach and Arugula Salad
- Roasted Cauliflower over Beetroot Hummus and Sautéed Greens
- Classic Chocolate Chip Pancakes
- Oven Roasted Potatoes
- Deviled Eggs
- Mini Cocotte Chocolate Cake
- Strawberry Cobbler With Vanilla Ice Cream
- Tequila Sunrise Cocktail
- Cranberry Brie Bites
- Spinach and Cream Cheese Twisted Pinwheels
- Creamy Potato Lettuce Salad
- Baby Potato Salad
- Eggless Strawberry Cake
Garlic Stacked Potatoes
My family loves potatoes, and for good reason. This vegetable is amazingly versatile, year-round available, and so easy to grow that even a kid could do it, which is why it is the first thing on my Mother’s Day brunch menu.
Stacked potatoes are exactly what it says. These are potatoes, cut into thin chips, and stacked before cooking. Now there are different ways to make them, but I find stacking them in a muffin tin the easiest.
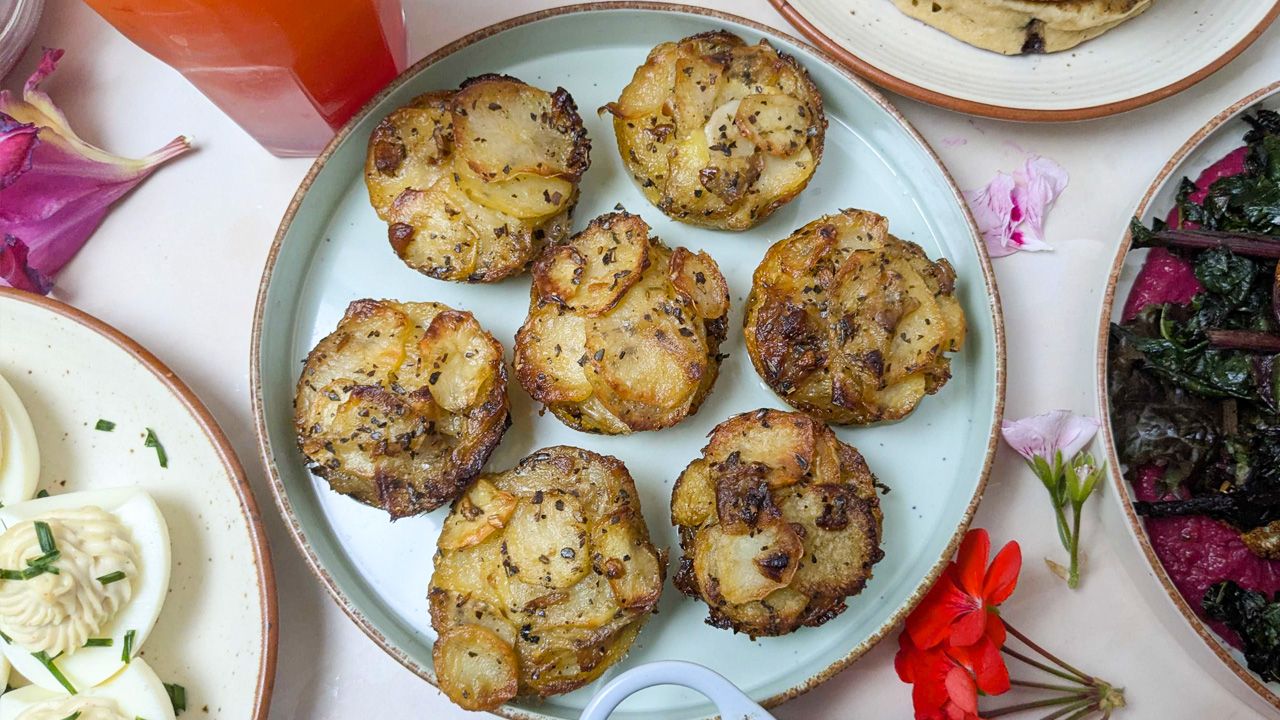
Prep Time: 15 Minutes
Cook Time: 45 Minutes
Total Time: 1 Hour
Ingredients:
- 4 Yukon gold or russet potatoes
- 5 garlic cloves (confited)
- 1 teaspoon dried oregano
- 2 tablespoons garlic-infused olive oil
- 100 g grated Parmesan cheese
- 1 stick of butter (100 g)
- Paprika
- Salt
- Pepper
- Rosemary sprigs
Instructions:
- Slice the Potatoes: Preheat the oven to 200 degrees Celsius. If you have excellent knife skills, slice the potatoes into thin chips or use the mandolin slicer to keep the size uniform
- Prepare the Mix: Crush and make a paste of confit garlic. Mix melted butter, garlic-infused olive oil, and crushed garlic in a large bowl. Add half of the grated cheese and dried oregano to the mixture
- Toss Potatoes in Mixture: Toss the sliced potatoes in the mixture, coating each slice generously
- Stack and Bake: Lightly grease the muffin tin, place small rosemary sprigs at the bottom, and start stacking the potato slices. Put bigger slices at the bottom and smaller ones on top. Add grated Parmesan between every 5 slices. If you have any mixture left by the end of it, pour it atop every stack. Transfer to the oven and let the taters bake for 45 minutes
- Remove and Serve: Remove the stacks from the muffin tin and serve hot with a generous sprinkle of Parmesan and flaky sea salt
You can make as many stacks as you want. They can be served with a dip, but we love them as is.
Sweet and Sour Salad
This recipe is one of my favorite creations ever. It uses the general spring vegetables in different textures with toasted chickpeas, which are then slathered in the most amazingly tangy dressing. You won’t even guess the main ingredient. And no, it is not lemon.
By the looks of it, you can guess that it gets its sweetness from the sweet potatoes, carrots, and beetroot. The sour is supplied by a raw mango dressing. Raw, unripe, or green mango, if you will. If this doesn’t appeal to you, you can try my spring rainbow salad.
Don’t use canned chickpeas; use dried chickpeas and boil them. You can soak them the night before, which makes them cook faster. So let’s get to it.

Prep Time: 20 Minutes
Cook Time: 50 Minutes
Total Time: 1 Hour and 10 Minutes
Ingredients:
- 150 g of boiled chickpeas
- 150 g of frozen/fresh chopped sweet potatoes
- 1 beetroot cut into triangles
- 1 carrot in ribbons
- 70 g diced purple cabbage / or normal cabbage
- A handful of red lettuce leaves
- 2 raw (green) mangoes
- 250 ml extra virgin olive oil
- 2 garlic cloves
- Salt
- Pepper
- Paprika
Instructions:
- Boil Chickpeas and Cut Vegetables: Preheat the oven to 200 degrees Celsius. Put the chickpeas for boiling while you cut the vegetables. Cut carrots into ribbons; chop beetroot into uniform slices and then into triangles; cube the potatoes; and dice the cabbage. Now sauté the beetroot in a skillet with olive oil, salt, and pepper
- Bake Sweet Potatoes and Chickpeas: Once the chickpeas are cooked (squeeze one between your fingers; if it gets easily smashed, it is cooked), add them and the sweet potatoes to a baking sheet. Drizzle extra virgin olive oil, salt, pepper, and paprika on them and gently mix everything. Let both bake until sweet potatoes are cooked, and chickpeas are toasted (about 40 minutes)
- Make the Dressing: Peel the green mango and remove the flesh from the seed. Put the flesh in a blender, along with olive oil, salt, and pepper. Blintz and taste to check the salt and pepper
- Toss Everything Together: Once all the ingredients are chopped, blintz and cooked. Put the dressing in a large bowl and start adding the ingredients. Toss the salad together using a wooden spatula and mix until everything is slathered in the tangy dressing
And that is how you make my sweet and sour salad. The sweetness of the veggies is well balanced with the tang of the dressing, and trust me, it is heavenly. Give it a try and thank me later.
Grilled Peach and Arugula Salad
This recipe is a celebration of the magnificent fruit, the lifegiver, and the sweet moments still fresh in memory. I created this grilled peach and arugula salad as a nostalgic treat, remembering the peach tree that once stood next to our house. During the trying times of the COVID lockdown, that peach tree showered us with more fruit than we knew what to do with. Alas, a couple of years later, it mysteriously withered and died. This grilled peach and arugula salad is a tribute to that tree, the summer it brightened, and my mother, the one who planted it with love.
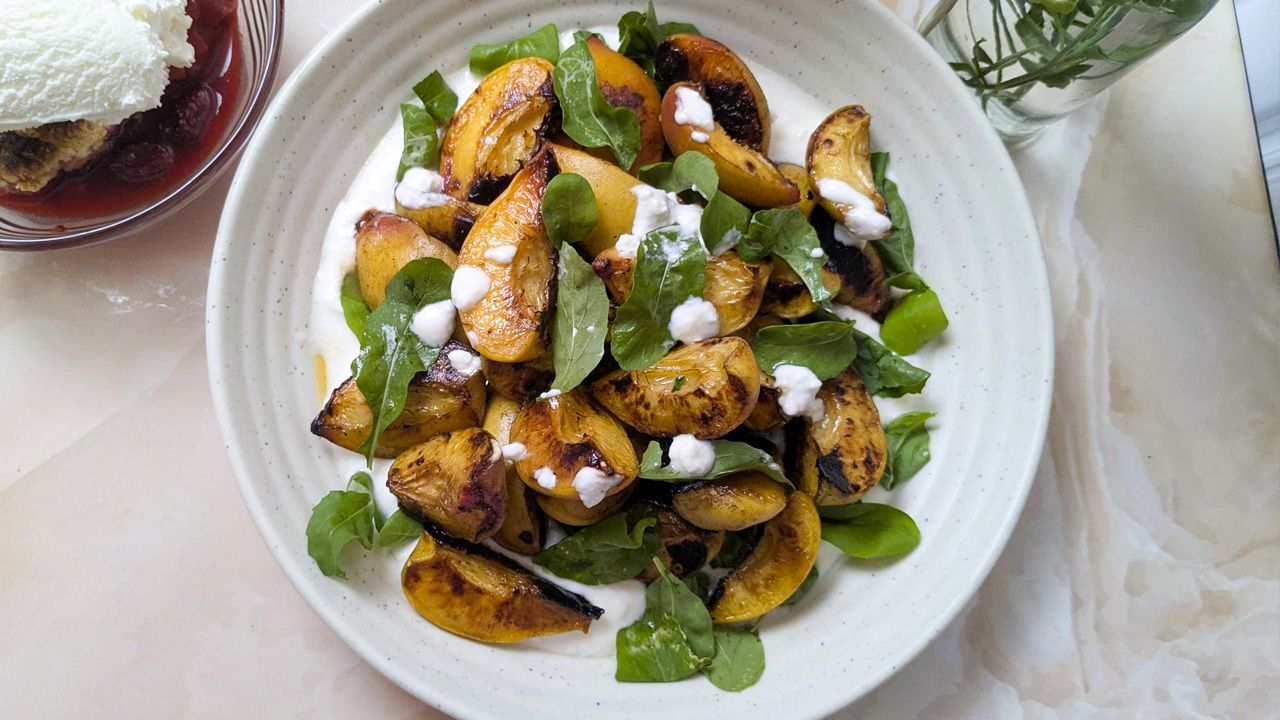
Prep Time: 10 Minutes
Cook Time: 20 Minutes
Total Time: 30 Minutes
Ingredients:
- 500 g firm-ripe peaches, quartered
- 50 g Baby arugula
- Extra virgin olive oil
- 50 g of cottage cheese
- Greek Yogurt
- Balsamic vinegar
- Salt
- Pepper
Instructions:
- Quarter and Grill Peaches: Wash and dry the fruit, and then cut each peach into quarters. Once all the fruit is cut, grill the fruit however you want. I grilled them on my cast iron skillet with a little bit of olive oil, on all sides, until charred
- Make the Base: Whisk together crumbled up cottage cheese and yogurt with salt and pepper to create a consistent paste. Layer this paste on a plate, making the base for the salad
- Plate Everything: Place the grilled fruit and baby arugula atop the cheese-yogurt base. Drizzled a bit of that base paste and balsamic vinegar on the peaches. You can sprinkle salt and pepper to your liking
You can swap cottage cheese for goat cheese or feta, or add more arugula. But my recipe has the peach as the main character; others are merely side characters. Try this and let me know your thoughts.
Roasted Cauliflower over Beetroot Hummus and Sautéed Greens
This one was unexpected. I wanted to make beetroot hummus with roasted cauliflower, but I often use collard greens and beet leaves in my recipes, so I thought there was no harm in adding them to this recipe either. Well, I was pleasantly surprised because this was a banger. Let me tell you how I made an amazing salad for my Mother’s Day brunch. And don’t you dare use canned chickpeas. Just no!
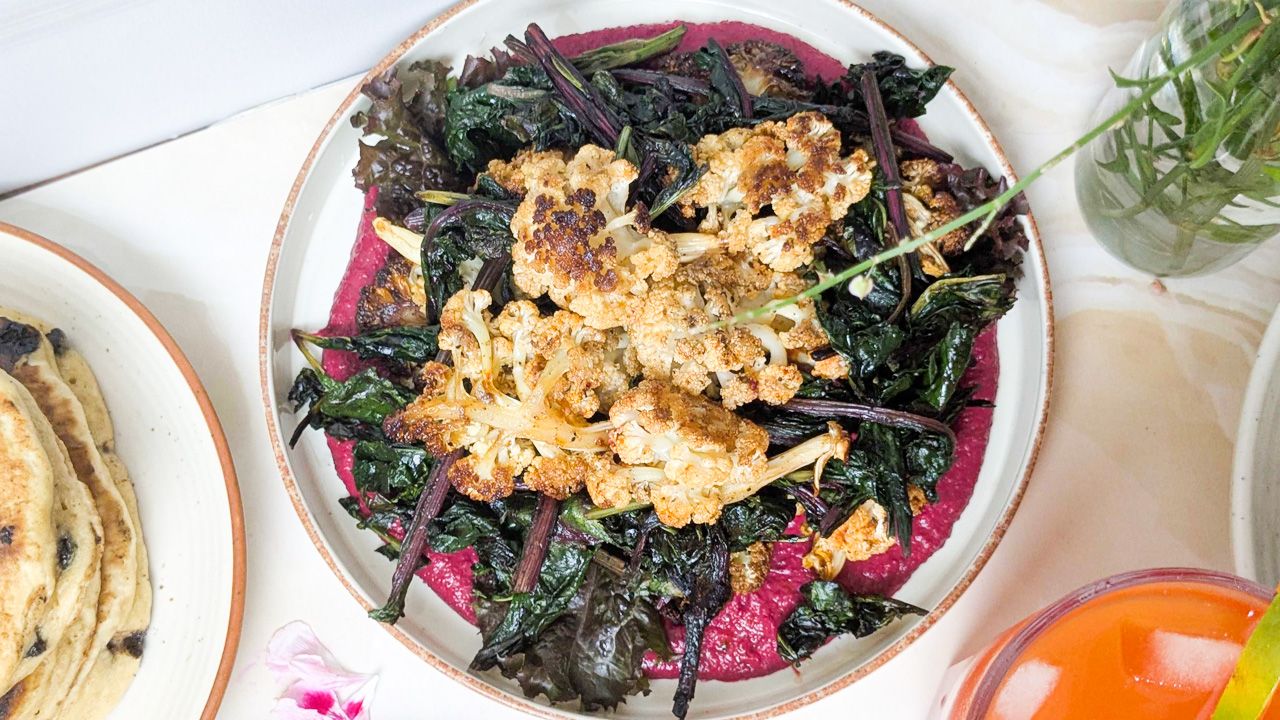
Prep Time: 20 Minutes
Cook Time: 20 Minutes
Total Time: 40 Minutes
Ingredients:
- 400 g cauliflower florets
- 1 beetroot with leaves
- 150 g boiled chickpeas
- 150 ml olive oil
- 2 tablespoons lemon juice
- 3 garlic cloves
- A handful of red lettuce leaves
- Salt
- Pepper
- Paprika
- Broccoli/cauliflower leaves (optional but recommended)
Instructions:
- Bake the Vegetables: Cut the leaves about two inches above the head of the beetroot. Then, nicely wash, scrub it, and stab with a fork a few times. Wrap it in aluminum foil and bake at 220 degrees Celsius for about 20 minutes. Toss the cauliflower florets in a mixture of olive oil, paprika, salt, and pepper. Evenly spread the florets on a lined parchment and bake for 20 minutes (Tip: Bake them at the same time for quick preparation and save time and energy)
- Sauté the Collard Greens: While the vegetables bake in the oven, sauté the collard greens in a skillet with a little oil, sprinkle salt and pepper. You can boil them, but I find the boiled texture unappealing. The choice is yours when trying out this recipe
- Make the Hummus: Once the beetroot is cooked, let it cool and remove the peel, which should come off easily. Chop it into small pieces, throw them in a blender with the oil, chickpeas, garlic, and lemon juice. Add salt and pepper according to your taste
- Plate it: Spread the beetroot hummus evenly on a plate. Place the lettuce leaves and layer the collard greens and roasted cauliflower florets atop it. Squeeze a lemon over it if you want
The beetroot leaves with roasted cauliflower tasted delicious. The hummus was creamy despite its grainy texture. You have to try it to believe it. So do that and thank me later. But remember, no canned chickpeas.
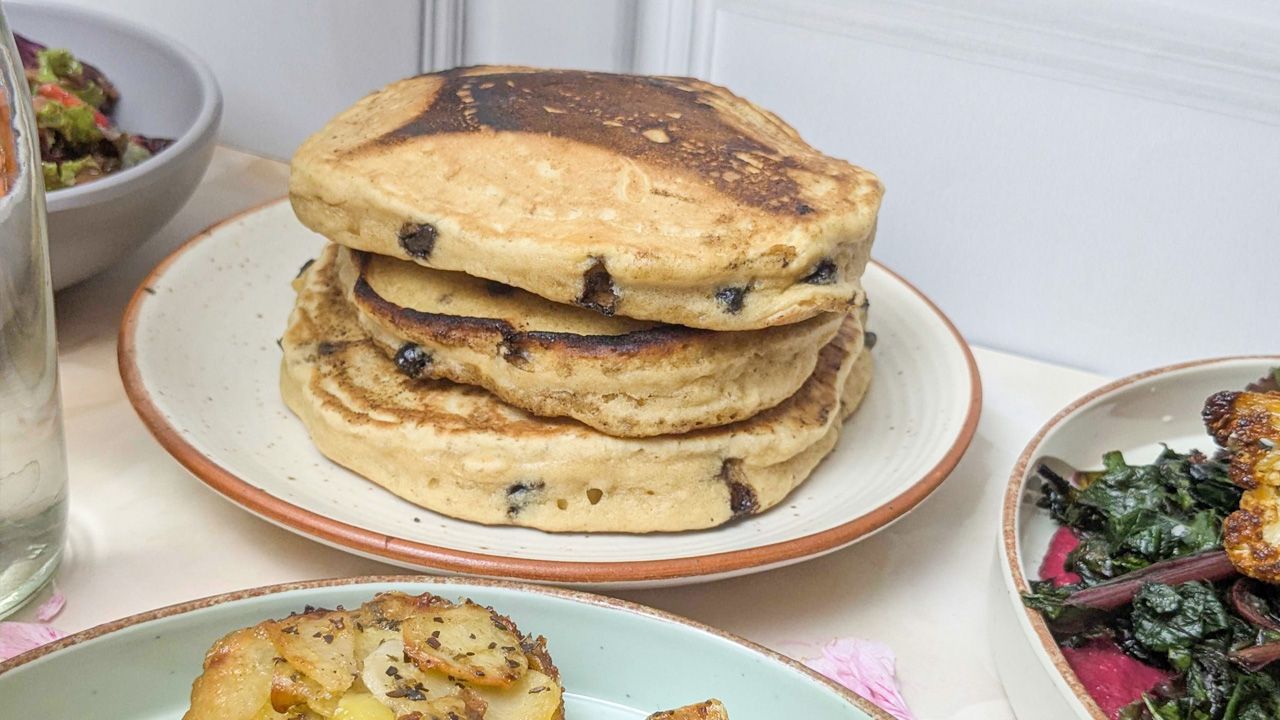
Classic Chocolate Chip Pancakes
Pancakes are already as good as they are ever going to get. I have tried pumpkin pancakes, sweet potato pancakes, blueberry pancakes, banana pancakes, and chocolate pancakes. But the good ol’ chocolate chip pancakes remain my favorite. My siblings also love these pancakes, hence the inclusion in this special Mother’s Day brunch. Don’t judge it by the looks alone.
Prep Time: 5 Minutes
Cook Time: 10 Minutes
Total Time: 15 Minutes
Yield: 8 Pancakes
Ingredients:
- 180 g all-purpose flour
- 1 tablespoon baking powder
- ½ teaspoon salt
- 1 teaspoon ground cinnamon
- 3 tablespoons ground sugar
- 100 ml of milk
- 1 egg beaten
- 3 tablespoons melted butter
- 1 teaspoon vanilla extract
- 1 pinch of baking soda
- 1 stick of butter
- 100 g dark chocolate chips
- Maple syrup and butter (for serving)
Tip: Mix dry and wet ingredients in separate bowls and then gently stir in the dry in the wet mixture.
Instructions:
- Mix Dry Ingredients: Sift the flour, baking powder, sugar, salt, ground cinnamon, and baking soda in a bowl. It helps remove any lumps and ensures that your batter is smooth
- Mix Wet Ingredients: Whisk together milk, egg, melted butter, and vanilla extract in a separate bowl until everything is homogenous
- Whisk Into Batter: Gently add wet ingredients into the dry in small quantities while whisking slowly. Once the batter is smooth and there is no dry flour visible, gently fold in the chocolate chips using a wooden spatula. Do not over-mix
- Make Pancakes: Place a non-stick pan on medium heat, add a small amount of butter, and pour a scoop of the batter atop the melted butter. Let it cook for 2-3 minutes until bubbles form on the edges of the pancake. Flip it and let it cook until the other side is equally browned
- Serve: You can serve these pancakes with your choice of topping. For me, maple syrup and butter work the best, but don’t add them until you are ready to eat, or the pancakes get soggy
You can serve it with fresh fruit or whipped cream as well, but for the ultimate experience, go old-fashioned with syrup and butter.
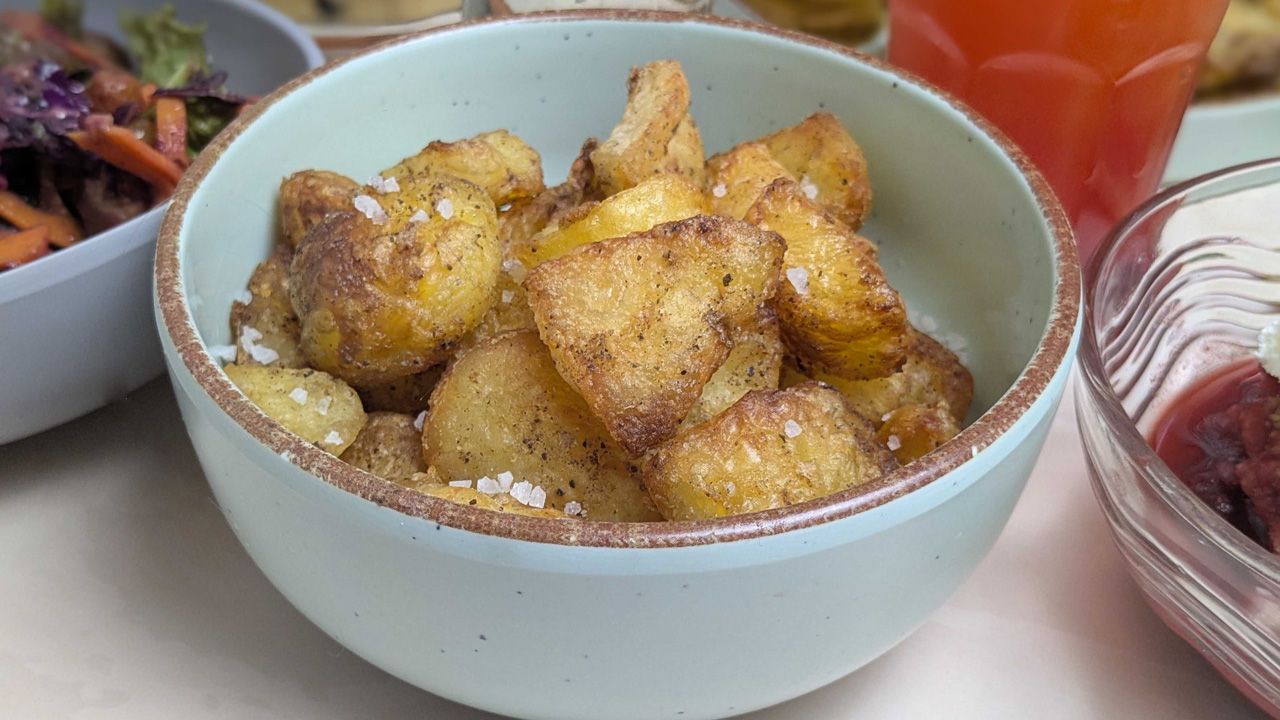
Oven Roasted Potatoes
Oven-roasted potatoes are the best way to eat taters. I make them at least once a week. The best part? You can have roasted potatoes for breakfast, lunch, or dinner. There are so many recipes, so many variations for roasted potatoes, but I like a simple 4-ingredient recipe. Most people use tallow, but is often make these potatoes with either olive oil or canola oil. So let’s get to it.
Prep Time: 10 Minutes
Cook Time: 60 Minutes
Total Time: 1 hour and 10 Minutes
Ingredients:
- 500 g Yukon gold or red potatoes
- 4 tablespoons olive oil
- Salt
- Pepper
- Flaky sea salt (optional)
Instructions:
- Parboil the Potatoes: Preheat the oven to 200 degrees Celsius. Wash and peel the potatoes. Cut into 1-inch cubes and parboil in salted water. Once the potatoes are fork tender, drain the water and put them in a Tupperware, put on the lid, and give a vigorous shake
- Bake: Place the potatoes after shaking on a baking tray. Drizzle olive oil, salt, and pepper, and toss together so that every potato cube is coated in oil. Bake for 50 minutes or until baked to your liking, while turning them once or twice
- Season and Serve: I like to season the roasted potatoes with flaky sea salt. You can use fresh herbs, bacon bits, or sour cream
I have tried the version where you leave the potato skin on, but I like the peeled version better. Shaking the parboiled cubes is optional, but it helps the potatoes create a fluffy coating that gets really crispy in the oven.
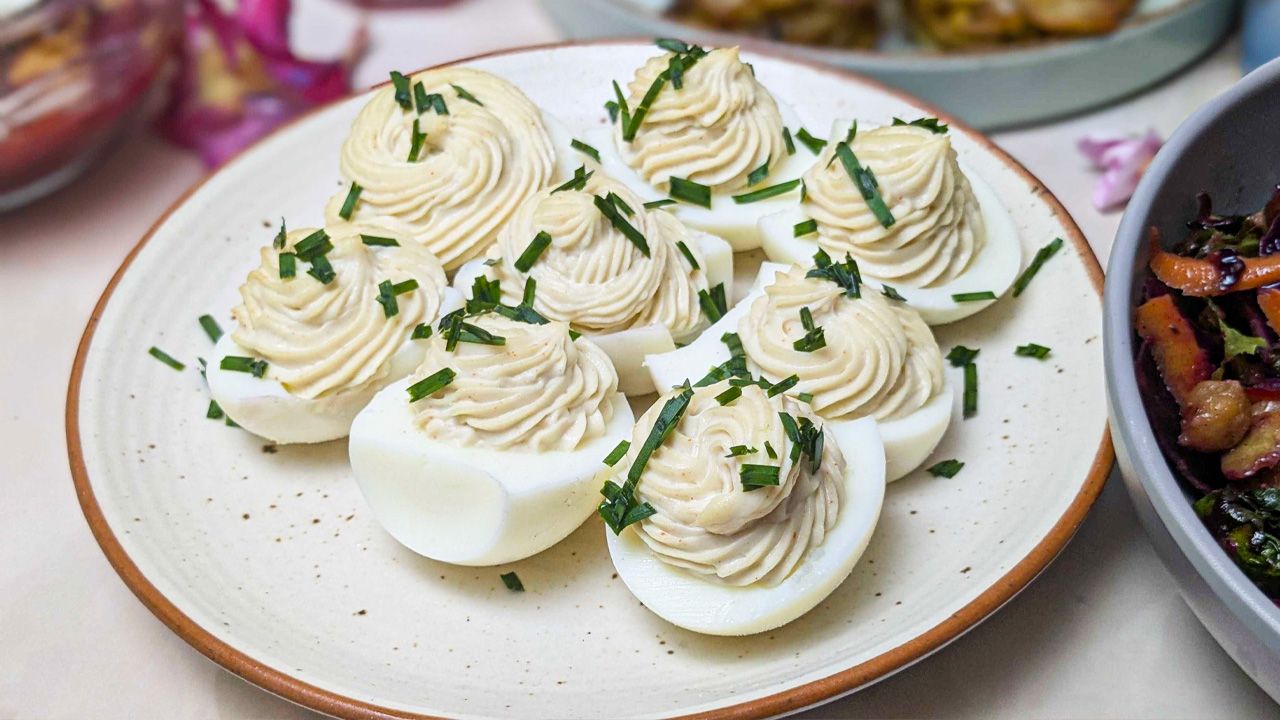
Deviled Eggs
I am more of a scrambled egg girl. But deviled eggs have been a favorite in my family. So I decided to give them a whirl. The recipe is fairly easy and uses basic ingredients. The only issue with this version was that I ended up over-boiling the eggs and ended up with a slightly grey-ish tinge to the yolk. You need 14 minutes on the clock to get a perfect hard-boiled egg with a yellow yolk. I left mine on heat for 20 minutes, and that was a mistake.
However, over-boiling an egg only ruins its look. So that was good for me. And yes, I know, my piping skills can use some work. Don’t be nasty about it.
Prep Time: 10 Minutes
Cook Time: 15 Minutes
Total Time: 25 Minutes
Ingredients:
- 6 eggs
- 2 tablespoons mayonnaise
- 1 teaspoon Dijon mustard
- Salt
- Pepper
- Paprika
Instructions:
- Boil Eggs: Boil a pot of water and gently lower the eggs into the boiling water. Cook for 14 minutes and transfer to the ice water, and peel the shell
- Remove Yolk and Prepare the Mixture: Cut the eggs in half and remove the yolks using a spoon. Put the yolks, mayonnaise, mustard, paprika, salt, and pepper in a big bowl and beat into a consistent mixture
- Garnish and Serve: Garnish with garlic chives or any herb and serve
I liked the taste of deviled eggs, but I am very partial to other types of cooked eggs. I loved the fresh herb as a garnish. For the next version, I might want to add some crispy bacon on top.
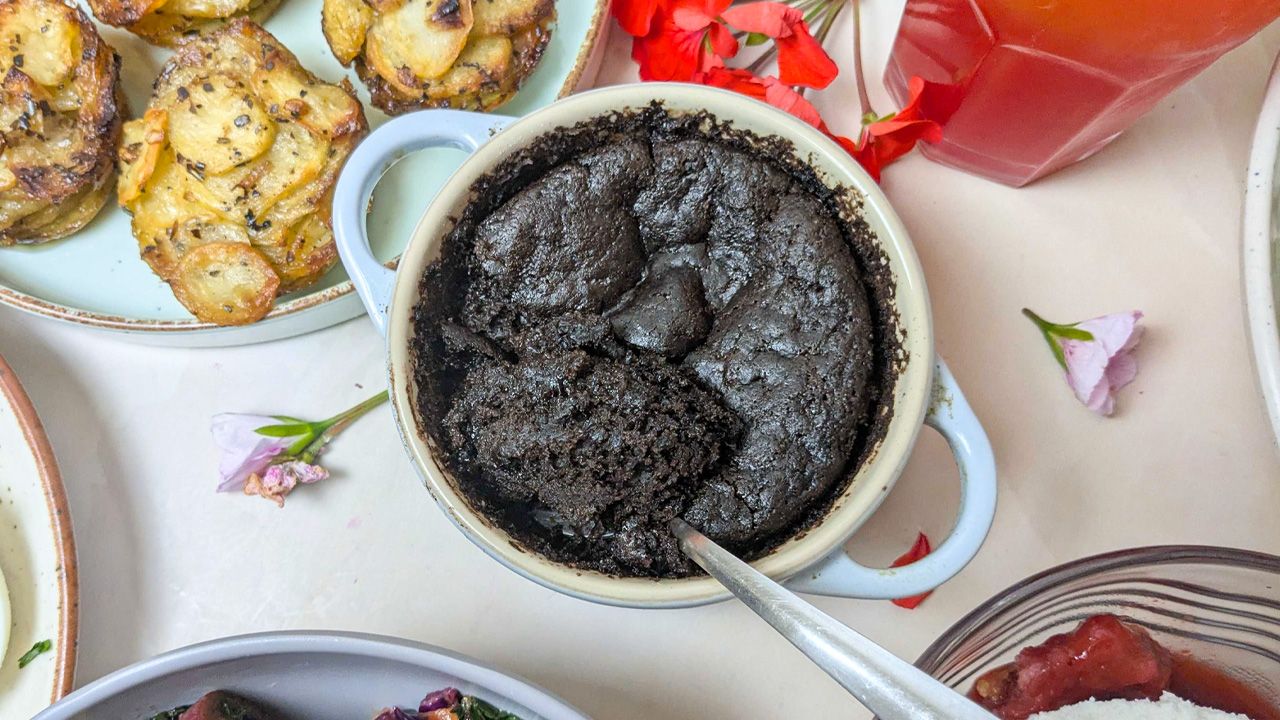
Mini Cocotte Chocolate Cake
Now we come to the desserts. This mini chocolate cake was made for a one-person serving, for my mom. This recipe is based on the concept of one pot, one portion. And I got to use the adorable Le Creuset mini cocotte. I mixed all the ingredients in the cocotte itself and baked the cake for about 20 minutes.
Prep Time: 5 Minutes
Cook Time: 20 Minutes
Total Time: 25 Minutes
Ingredients:
- 5 tablespoons all-purpose flour
- ½ teaspoon baking powder
- ½ teaspoon vanilla extract
- 1 teaspoon vegetable oil
- 1 pinch salt
- 2 tablespoons ground sugar
- 2 tablespoons dark chocolate chips
Instructions:
- Mix and Bake: Preheat the oven to 180 degrees Celsius. Add everything to the cocotte. Mix the ingredients using a chopstick or fork. Fold in the chocolate chips at the end and place in the oven for 20 minutes
- Serve: You can serve the hot cake with ice cream or chocolate ganache over it, or simply as is
This one-pot, one-portion cake was so amazingly chocolaty that I have made it twice this week. My mum is going to love it so much that I can simply picture her face when she eats it.
Strawberry Cobbler With Vanilla Ice Cream
Now comes the star of the show: Strawberry cobbler with vanilla ice cream. This was my first time making strawberry cobbler. I am a fan of pear and apple cobbler, but this one takes the cake. You will find so many variations to this dessert, but I should tell you that it won’t be as good if you stray from my recipe. I can’t stress how good it was. This has become my favorite summer dessert.
I used a 1.6-liter, 26-cm (10-inch) oval dish for this recipe. You can adjust the quantity of a few ingredients to better suit the size of your baking dish.

Prep Time: 15 Minutes
Cook Time: 35 Minutes
Total Time: 50 Minutes
Ingredients:
- 200 g fresh strawberries
- 2 tablespoons of lemon juice
- 100 granulated sugar
- 100 unsalted butter
- 120 g all-purpose flour
- 1 teaspoon baking powder
- 50 ml milk
- 1 pinch of salt
- 1 teaspoon vanilla extract
- ½ teaspoon ground cinnamon
- 1 tablespoon brown sugar
Instructions:
- Macerate the Berries: Preheat the oven to 180 degrees Celsius. Wash and dry the strawberries. Hull the berries and cut them in half. Quarter the bigger berries. Put them in the baking dish you’ll be using, sprinkle with ground sugar, mix, and set aside
- Make the Biscuits: Melt the butter and mix in the milk. Add a pinch of salt, baking powder, and flour. Mix into a thick mixture. It will be similar to cookie dough
- Bake: Mix in the vanilla extract, cinnamon, and lemon juice into the strawberries. Scoop out the dough and make it into thick discs. Ensure that these biscuits cover the berry mixture below, leaving only tiny gaps between each biscuit. Brush milk atop the biscuits and sprinkle brown sugar. Transfer to the oven and bake for 35 minutes
Serve With Ice Cream: Serve hot (can be reheated in the microwave) with a scoop of vanilla ice cream
Trust me when I tell you that this is the best dessert recipe I have created. The little amount of cinnamon and lemon juice made all the difference.
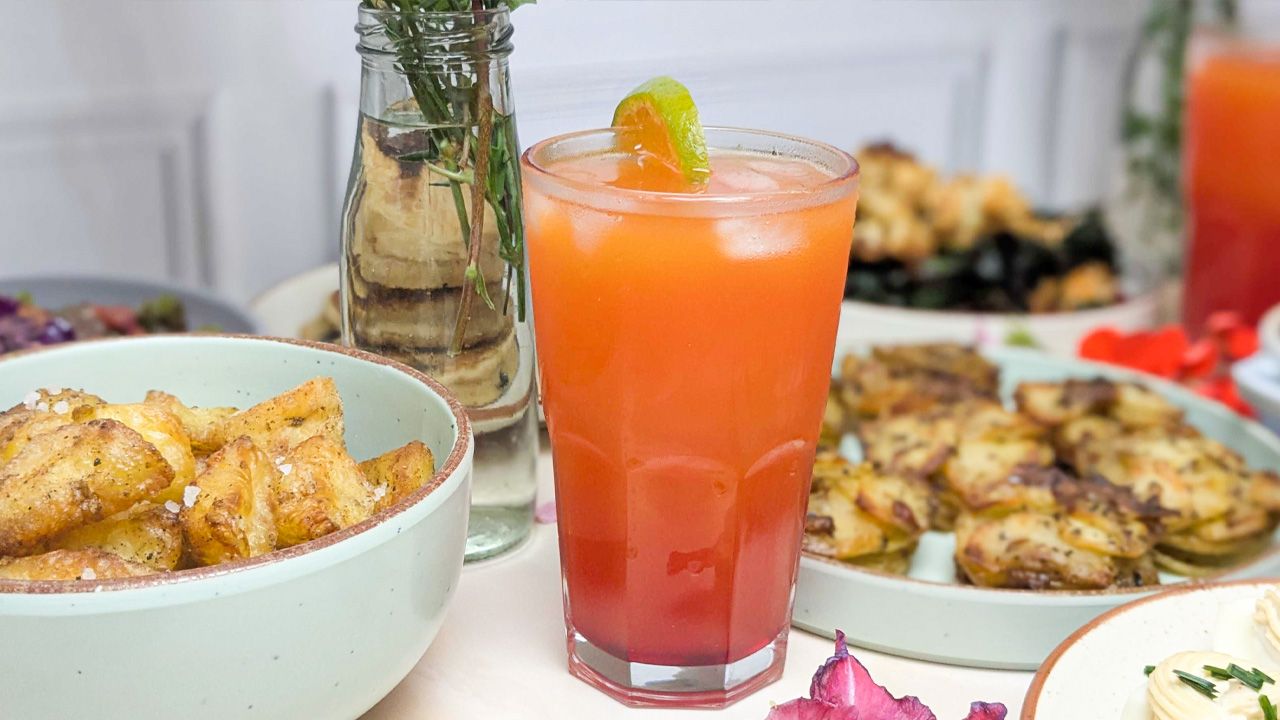
Tequila Sunrise Cocktail
I rarely host parties, an occasion when you can serve signature cocktails. So naturally, I didn’t perfect my cocktail game. However, making a tequila sunrise is quite easy. You know your ingredients, you know the amounts, and when to add what, and it comes together rather quickly.
I really love the beautiful ombre effect of the drink. The alcohol content is fairly low, and the sweetness of the orange juice is well-balanced. It only takes 5 minutes to make this gorgeous cocktail.
Ingredients:
- 40 ml Tequila
- 100 ml fresh orange juice
- 10 ml Grenadine
- Ice cubes
Instructions:
Fill the glass with ice. Pour in the tequila and orange juice and stir it. Then gently pour the grenadine down the side of the glass over the back of a teaspoon. Do not mix. The dark syrup sinks to the bottom and creates a beautiful ombre effect. Garnish with half an orange slice.
The ingredient measurements are per glass. You can multiply it by the number of people you will be serving.
Cranberry Brie Bites
No gathering is complete without a couple of delicious appetizers. These cranberry brie bites make the perfect addition to your Mother’s Day brunch table. I made these with dried cranberries, but if you get your hands on fresh fruit, use those.
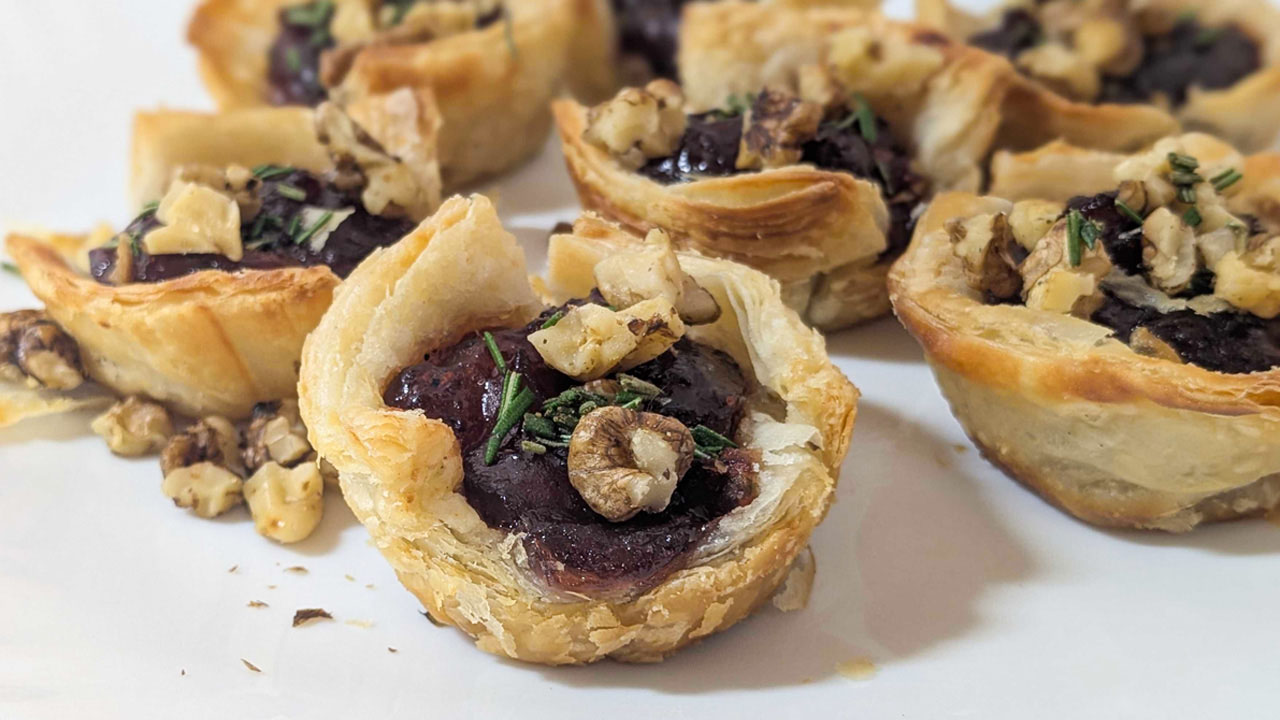
Ingredients:
- 1 puff pastry sheet
- Cubed brie cheese – 200g (7oz)
- Cranberry sauce – 80g (1/3 cup)
- Toasted and chopped walnuts or pecans
- Rosemary sprigs, roughly chopped
Instructions:
- Prep the Puff Pastry: Preheat the oven to 220 degrees Celsius (425 degrees Fahrenheit). Take a mini muffin tin and cut the puff pastry into 3×3-inch squares. Place each square into a separate muffin tin hole and gently press down to make a cup
- Fill the Pastry Cups: Fill each pastry cup with a cube of brie, topped with a teaspoon of cranberry sauce
- Bake and Serve: Place the muffin tin in the oven and bake for 15 minutes or until golden brown and bubbly. Remove the cranberry brie bites from the muffin tin and arrange on a platter. Top with toasted and chopped walnuts and rosemary sprigs. Serve hot
That’s it. All you need is 5 ingredients, 3 steps, and about 30 minutes. You can also make it ahead of the day and warm it in the microwave.
Spinach and Cheese Twisted Pinwheels
If you, or your family, aren’t too keen on sweet appetizers, try my spinach and cheese twisted pinwheel recipe. It is quick and easy to make, with crispy on the outside and chewy on the inside, with gooey bites.
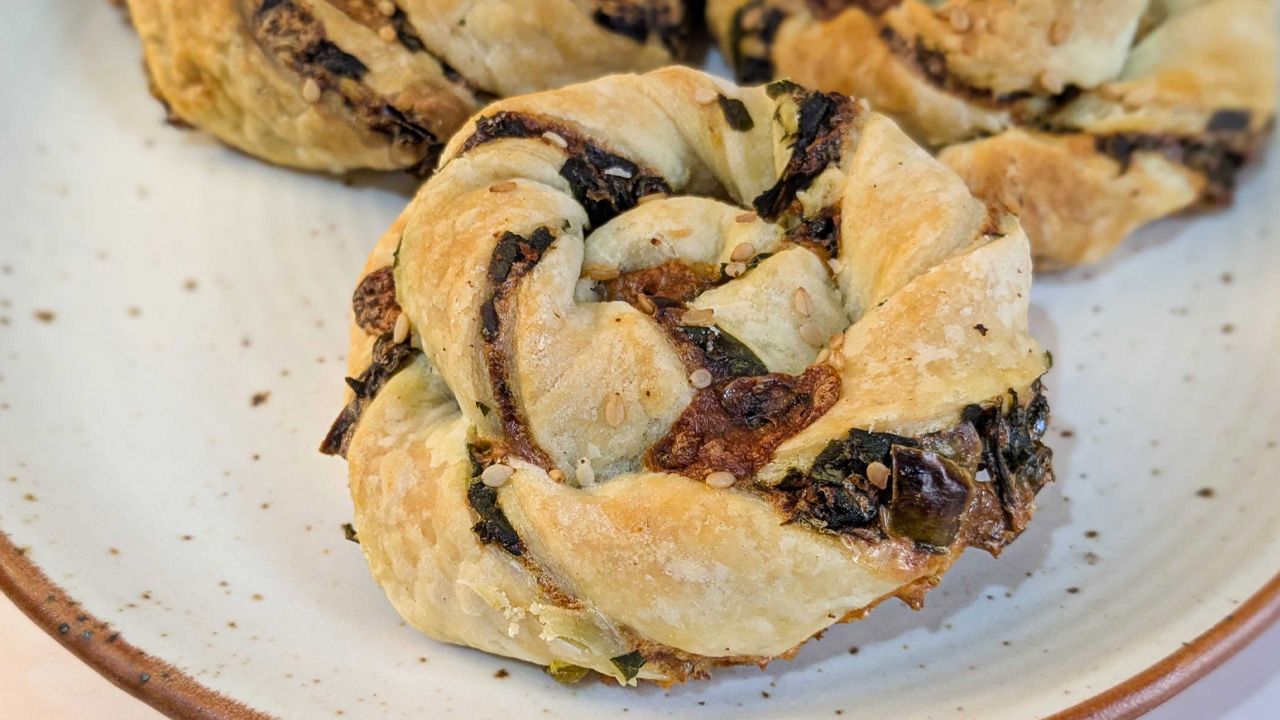
Ingredients:
- Softened cream cheese – 100g (3.5oz)
- Fresh spinach – 280g (10oz)
- Shredded cheese (mozzarella and cheddar) – 110g (1 cup)
- 2 sheets puff pastry (preferably homemade)
- Salted Butter – 2 Tablespoons
- Salt
- Sesame seeds – 1 tablespoon
- Garlic powder (optional)
Instructions:
- Prep the Ingredients: Preheat the oven to 218 degrees Celsius (425 degrees Fahrenheit). Meanwhile, wash, blanch, and squeeze out the moisture from the spinach. Once the moisture is barely there, give the spinach a nice dicing. In a large bowl, combine the diced spinach, cream cheese, a pinch of salt, and garlic powder, if using
- Spread Mixture Over the Pastry: Roll out one sheet of the puff pastry into the mentioned size and spread the spinach and cheese mixture on it evenly. Spread the shredded cheese on it and top with the second puff pastry sheet
- Cut Into 1-Inch Strips and Twist: Take a rolling pin and roll the puff pastry slightly to seal the filling between two puff pastry sheets. Take a rolling-style cutter or a knife and cut the sheets into one-inch strips. Once cut, take individual strips and lightly twist them in the opposite direction (like you would a wet cloth to wring out water from it), and create pinwheels
- Bake and Serve: Place the twisted pinwheels on a baking sheet, brush with melted butter if making a vegetarian version (you can use egg wash, which works better), and sprinkle with sesame seeds. Bake in the oven for 15-25 minutes or until golden brown. Remove and let them cool slightly before serving
It is also a great make-ahead appetizer. Or you can just prep all the ingredients a couple of days before and perform a quick assembly 45 minutes before the guests arrive.
Creamy Potato Lettuce Salad
I completely understand that when hosting a gathering, cooking everything on the day of is practically impossible. Therefore, I am always interested in creating recipes that you can create beforehand, freeing up mingling time when the occasion arrives. My creamy potato lettuce salad is one of those recipes. Although originally made for Thanksgiving last year, it is perfect for your Mother’s Day brunch.
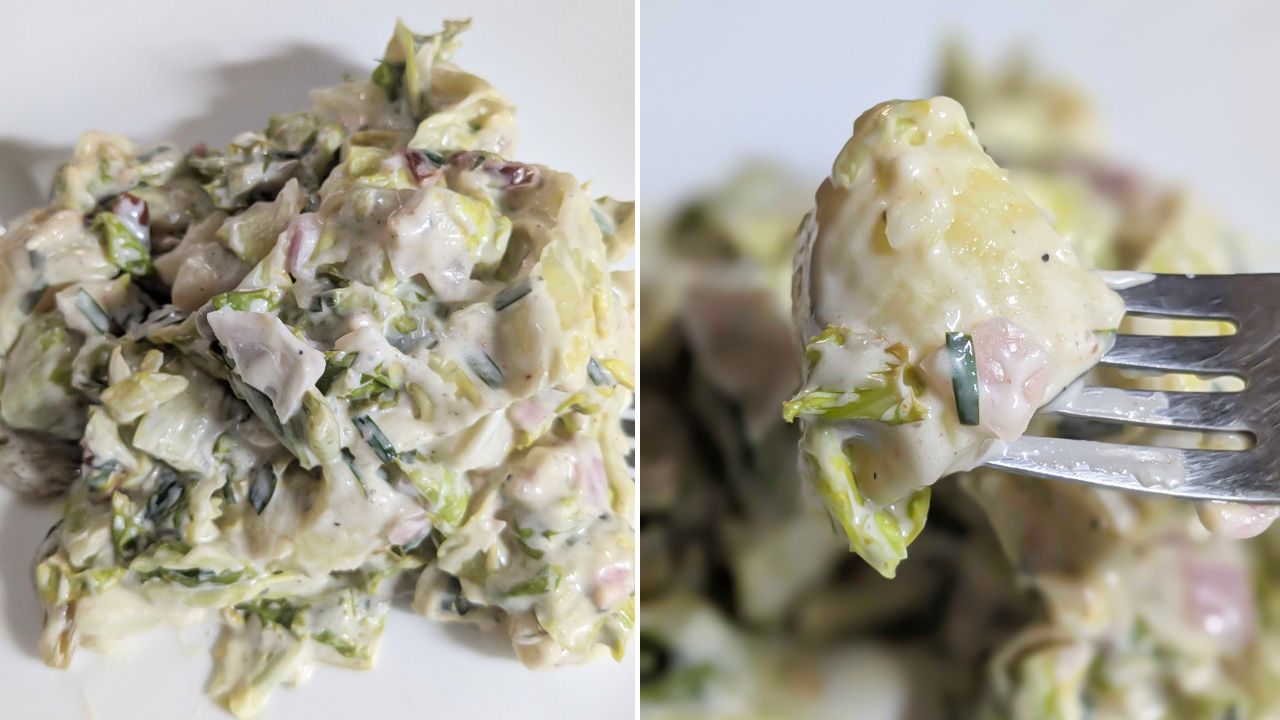
Ingredients:
- 500g medium-sized potatoes
- 250g mayonnaise of choice
- 1 tablespoon Dijon mustard
- 1 tablespoon honey
- 30-50 ml freshly squeezed lemon juice
- Fresh chives, finely chopped
- One large red onion, finely chopped
- One head of Batavia lettuce, chopped
- Salt
- Black Pepper
- 20g Chopped dried cranberries
Instructions:
- Peel and Boil Potatoes: Peel the potatoes and cube them into bite-sized pieces. Boil them in a pot with a tablespoon of salt for 5-10 minutes or until fork-tender. Once cooked, drain the water, rinse in cold water, and set aside to cool off
- Prepare the Creamy Dressing: In a small bowl, mix mayonnaise, mustard, lemon juice, and honey. Combine well and adjust the salt and pepper according to taste
- Mix and Serve: When the dressing is ready, and the potatoes are cooled off, mix everything in a large bowl and serve
If you are making this salad in the days leading up to the day, add lemon juice and seasoning right before serving. It stores great in the fridge and is great as a make-ahead Mother’s Day recipe.
Baby Potato Salad
If you’re not a fan of creamy potato salad, this baby potato salad may just change your mind. It is made with about 5 ingredients (except the seasonings) and feels like summer on your tongue, making it perfect for the Mother’s Day table.
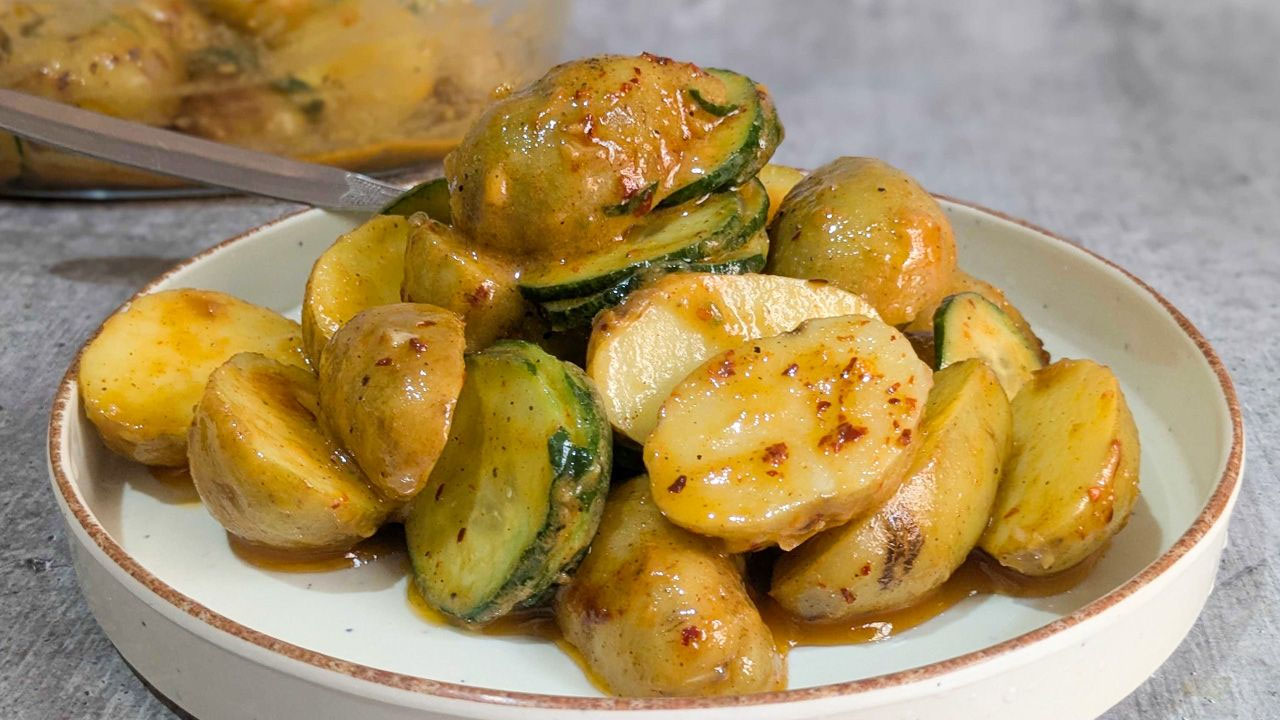
Ingredients:
- 2.5 lbs. baby potatoes
- One medium-sized cucumber
- 3 garlic cloves (confit or raw)
- One cup of extra virgin olive oil
- Half a cup of fresh lemon juice
- One teaspoon of Dijon mustard
- Salt
- Black pepper
- Chili flakes
Instructions:
- Half and Par Boil the Potatoes: Wash the baby potatoes and cut them into halves. Then boil them till they are fork-tender in salted water
- Slice the Cucumber: While your potatoes boil, cut the cucumber into thin slices. You can use a knife or do it with a mandolin slicer (I used a mandolin; my knife skills are not professional-grade yet)
- Make the Dressing: Add the olive oil, lemon juice, garlic, mustard, salt, and pepper into a blender and blend. Give it a taste and adjust the seasoning and lemon juice quantity if it feels low
- Toss and Serve: By the time you are done slicing the cucumber and making the dressing, the potatoes should be done cooking. Strain the water and transfer the potatoes, cucumber, and dressing into a large bowl. Add chili flakes, toss the dressing and vegetables a few times using a spoon, and serve
This salad is a great side dish for Mother’s Day brunch, with summer flavors coming together in a bowl. Give it a try and let me know your thoughts.
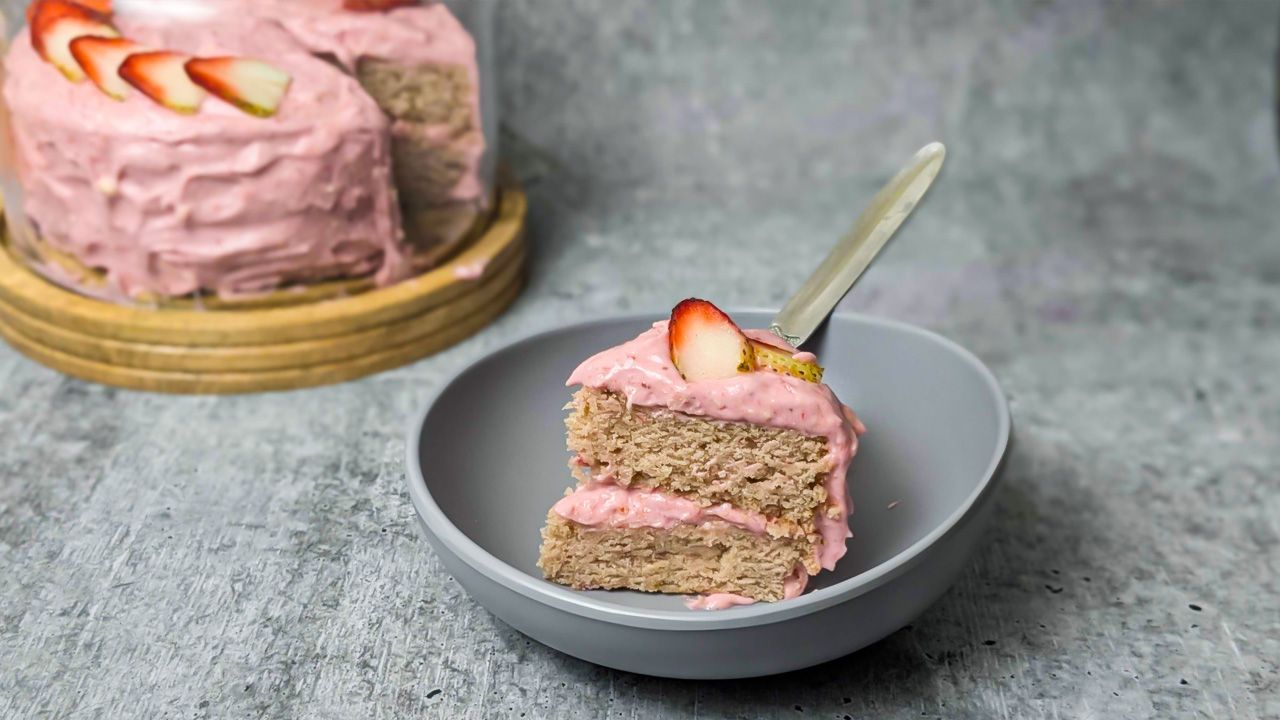
Eggless Strawberry Cake
Let me just come out and say it – one dessert is not enough for your Mother’s Day brunch, especially if you’re hosting the entire family. While the strawberry cobbler and one-portion chocolate cake are delicious, they have nothing on this extra-effort eggless strawberry cake with luscious cream cheese and butter frosting.
Ingredients:
For the Cake
- 2.4 cups of all-purpose flour (300 grams)
- 2 tablespoons baking powder
- ¼ teaspoon baking soda
- 1 teaspoon salt (when using unsalted butter)
- 7 oz. salted butter (200 grams)
- 1 ½ granulated sugar (300 grams)
- ½ cup milk (100 ml)
- 2 teaspoons vanilla extract
- 1 lbs. fresh strawberries (pureed and reduced)
- 2 ½ tablespoons vegetable oil (40 ml)
- Red food coloring (optional)
For the Strawberry Cream Cheese and Butter Frosting
- 3.5 oz. of cream cheese (100 grams)
- 7 oz. of salted butter (200 grams)
- 1 ½ lbs. powdered sugar sifted (680 grams)
- 1 teaspoon vanilla extract
- Strawberry puree (Leftover from the cake)
Instructions:
For the Cake
- Prepare Strawberry Puree and Let it Cool: Chop and puree fresh strawberries. Then reduce over medium heat while stirring slowly and constantly. It should be the consistency of a thick sauce. You need to let it cool down completely before adding it to your cake batter. (It works best to do this step the previous day, as it can take a considerable amount of cooling time depending on the size of your cake)
- Prepare Wet Ingredients: Preheat the oven to 175 degrees Celsius. Take out your hand mixer or stand mixer. Beat the room-temperature butter until creamy. Whisk in the granulated sugar until light and airy. Then add the vanilla extract and oil and whisk on medium-low setting until well combined. Divide the strawberry reduction, put half in the mixer, and let it all come together.
- Put in the dry ingredients: Sift the dry ingredients in a separate bowl. Scrape down the sides of the mixer bowl with a silicone spatula and add small amounts of the dry ingredients alternating with milk and whisking away at a low setting. At this point, you can add food coloring if you desire
- Pour and Bake: Line two 6-inch round cake pans with parchment paper. Pour the batter equally into the pans and bake for 30 minutes or until a skewer comes out clean. Take them out of the oven and let the cakes cool down for 20 minutes inside the pans. Then remove and cool on a wire rack
For the Strawberry Cream Cheese and Butter Frosting
- In a large mixing bowl, beat the cream cheese, room-temperature butter, and vanilla extract until smooth. Should take about 5-7 minutes, depending on the mixer
- Then add the powdered sugar alternating with the strawberry reduction and whisking on a low setting. Once all the sugar is added, beat the mixture on a medium setting until airy. If the frosting feels stiff, you can add a tablespoon or two of milk to smooth it out
This cake serves 8-10 people, so it’s perfect for a small gathering.
These recipes for my Mother’s Day brunch were so much fun; however, they take a lot of time. So if you are thinking of preparing everything here, you should consider making a few things in advance.
- You can chop the salad vegetables and store them in airtight containers in the fridge. They will be crunchy and fresh when you are ready to assemble, saving you time
- You can make the strawberry cobbler a day earlier
- You can boil chickpeas a day earlier and refrigerate them
This way, you can save time and have more time to spend with your family. But let me tell you one thing, all this work, elaborate Mother’s Day brunch recipes, working continuously for eight hours, was so worth it. For one, I got to taste and perfect everything during the practice session after all the work, and second, I know how much my mother and siblings will enjoy this brunch.
Follow Homecrux on Google News!


