")
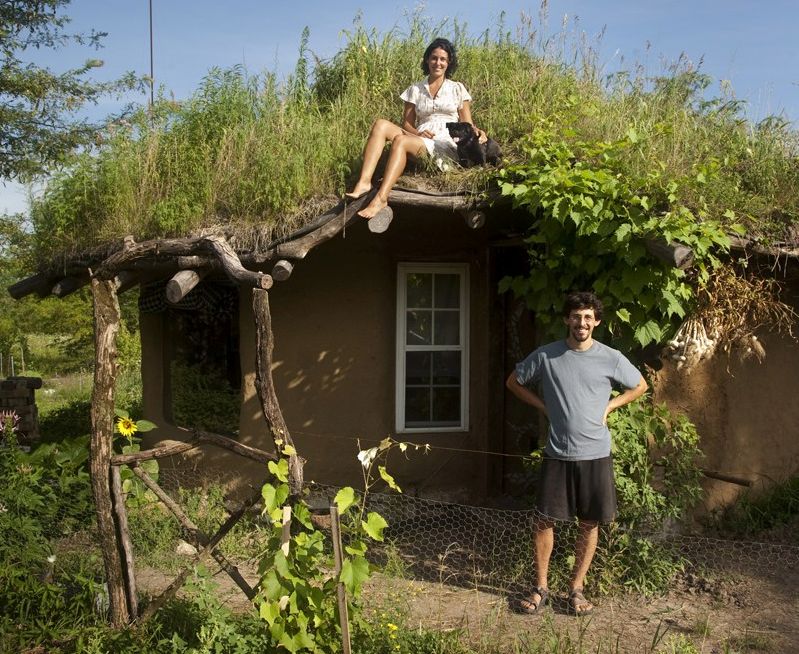
Initiative to go green is in full swing all around the globe; considering the adverse consequences of global warming. And we appreciate those who are inspiring the world to go green, in their own unique ways. One of the go-green activists is Ziggy Liloia whose cob houses are encouraging people to ditch luxury habitats made from cement and bricks.
The natural home builder from Berea, Kentucky works with 100% natural building materials including cob, straw bale, natural plaster finishes and timber framing. This means his builds have no negative impact on surrounding environment.
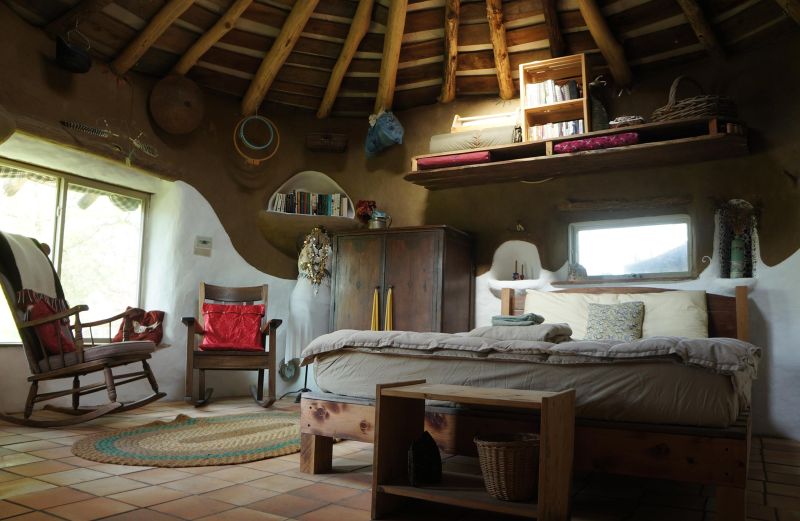
However, if you have doubts on the durability of his builds, let us tell you that the oldest cob house still stands after 10,000 years of exposure to the elements. And if comfort and interior design are some of your concerns, have a look at one of his cob houses, you will know how beautiful and cozy they look from inside.
Build a cob house for under $3000
The best thing about his builds is that they are ecologically efficient. Means, if you don’t have deep pockets to afford a costly habitat, you can still own a traditional cob house with all basic amenities to live a comfortable life.
Although Ziggy has built many mud houses, we are much inspired by his one creation that he built in 2009 for under $3000. The house was his first construction, for which he started digging a foundation on April 19, 2008. It was the same year when he launched “The Year of Mud,” a platform to promote his cob working. He spent total nine months to finish the cob house in April 2009.
The house conceals a cozy bedroom for two people, and dimensions of the interiors are 15’x13′ (roughly). The footprint of the entire house measures approximately 20’x18′. It does not include a kitchen and bathroom. However, if you want to include one, you’ll have to set your budget a bit high.
About the building course, Ziggy says;
When designing my cob house, it was an important goal to keep my building costs very low and to obtain as many building materials as locally as possible. Natural materials were my first priority, and recycled building supplies were preferred over new materials.
Ziggy literally worked every day with no hour count; except when it was raining, and when he was traveling. His wife April Morales was a great support during the journey of completing the house.
Cob house building material and cost
He shared a detailed recipe of his build with all records of the costs of building materials. For building the same you’ll need: sand over 30 tons (approx. $550), gravel about 13 tons (approx. $178), straw -16 bales (approx. $40), black walnut scrap lumber (approx. $100), misc. lumber (approx. $25), windows (approx. $220), electrical supplies (approx. $30), galvanized wire (approx. $30), nails (approx. $100), raw linseed oil for floor (approx. $72), EPDM pond liner (approx. $622), polycarbonate (approx. $400) for skylight, and for the rocket stove, firebricks (approx. $70) and flue pipe (approx. $228).
Few materials like clay for cob and roof rafters are not mentioned above, as they were obtained for free from their land as well as neighbors. In addition, Ziggy paid $1000 to the labor. So, if you include it too, the total cost comes around $4000.
Also Read: Ten Best Cob Houses and the Benefits of Building One
Things to remember before building a cob house
- Wherever you live, first you need to check with your government to see if it’s possible to build with cob. Some municipalities don’t allow constructing off-grid homes. If you live in a rural area, you are more likely to be allowed to build this type of home.
- Second, you’ll need a plot of land (relatively a flat spot)
- Once the spot is chosen, plan for the structure will need to be drawn up.
- Prep the building site. Make it even if it’s not flat. Dips need to be filled in and hills need to be smoothened.
Steps involved in building a cob house
Note that you need to protect the cob house from rain during the entire process of building, as rain and wet weather conditions can destroy your build.
1) Prepare the foundation
You need to prepare the foundation to carry the mass of your cob house and furniture. It should be firm and flat. Once dried, cob flooring has great durability, so sticking with it will not be a risk. The only thing you have to remember is, don’t walk and put heavy stuff over it until it’s completely dry. However, if you want your floor to be extra stiff and unbending, you can go with concrete flooring.
2) Construct a layout of the house with lumber
As cob needs support to stand for years to come, you’ll need to construct the decided layout of the house using lumber. The layout should be made of tough timber to carry heavy cob. Also, decide where you want to have doors and windows. Choose the layout for them too, and fix them before you move further.
3) Mixing the cob
After deciding the type of flooring you need, start mixing the cob for your walls and ground. To prepare a large cob tarp, mix about two parts of clay with one part of sand. Wet this down a little, and stomp on it. You can also use your feet to blend the material properly. Wearing mud boots is optional; however, mixing it barefoot gives a better product for cobbing as you can feel the texture.
Once it’s all prepared, add a thin layer of straw, preferably the longest pieces. Mix it well and add some more. Remember, if you roll the tarp around, the mix shouldn’t stick. Add more straw until it forms a stiff ball that doesn’t flatten out when you drop it.
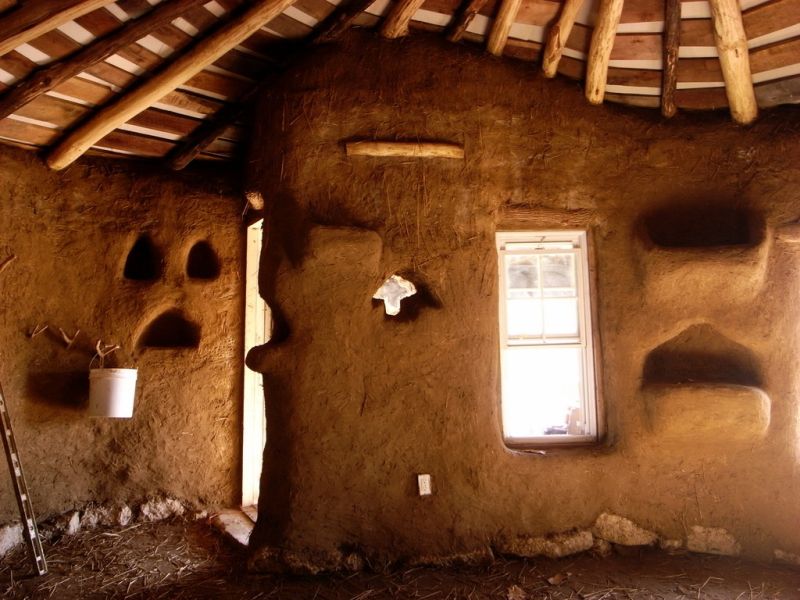
4) Cobbing the walls
Once the cob is ready, walls can be formed. Make same-sized lumps with cob to fill the wall’s layout. Make sure you are not slapping the lumps, as doing this can draw moisture out of the walls. Be sure you keep the sides straight, so they do not become thinner at the top and take on a pyramid shape. It’s better to use a ruler to measure the width of the walls.
When adding the second layer; poke small holes at the top of the first layer, so you leave some gap to let the walls dry. You can use bamboo sticks to make same-sized holes. Cob in a way to include electrical and plumbing plans for the house.
5) Make interesting additions
You don’t essentially have to stick with the above plan for building walls. You can do a bit of experimentation, and do interesting additions using your own sense of creativity and architectural skills. You can also use rocks or river stones with cob to build a more interesting structure.
We recently came across a cob house with inserted wine bottles, and the result was so beautiful. You can also use plastic bottles instead of wine. This way you’ll support green living.
6) Building the roof
When you get to the top of each wall, you can form the roof using wooden logs, poles or beams. After that, you can devise a tin roof, tarp, mud, or even solar panels. The choice is yours.
7) Final touches
When you are done with cobbing the house and roof, let it dry completely. After that, apply a smooth layer of mud to make the walls look level and even. You can do it until you achieve perfect looking walls for your cob house. When done, you can paint interior and exterior walls if you like.
8) Maintenance of the house
Your cob house will be weatherproof and won’t break down when it gets wet. However, constant raining may erode the surface, so you may need to recover the exterior every 10 years. Also, pest won’t be able to enter inside, and house fires won’t be a problem.
9) Insulation no more a concern
The habitat will be relatively cool in summers and warm in the winter season. If you live in minus temperatures, add a layer of insulation to the center, when you build the walls. This will keep the interiors cozy for a longer duration of time.
MORE FROM
INSPIRING COB HOUSES
Cob house built for $250 from mud, straw and clay
Mayne Island Cob Cottage seems like a little slice of heaven
This Cob House is as beautiful as its making
Follow Homecrux on Google News!


